How to Design Silicone Mask Spatulas with the Right Flexibility and Edge Thickness
The complaint that ends most mask spatula launches is not "it broke". It is "it fights me". The blade skates over the mask instead of dragging a bead of it, the tip curls up when the product gets thick, or the whole tool feels dead in the hand. By then the mould is cut and the first container is on a ship.
A silicone mask spatula looks like a spoon with a flat end. In use it is a cantilever. Every property a customer notices — how it loads product, how it releases it, how much pressure reaches the skin — comes out of the same three numbers: section thickness along the blade, the radius where the blade meets the body, and the hardness of the compound. Get those three into a drawing before tooling and most of the complaints never happen.
Why Does Flexibility Matter in Silicone Mask Spatula Design?
How Does Blade Flexibility Affect Mask Application?
An applicator does two jobs at once. It has to stay flat enough to carry a measured amount of cream or clay, and it has to bend enough that the edge keeps contact when the face curves away from the hand. Those jobs pull in opposite directions, and the blade is where they meet.
Think of the blade as a beam fixed at the neck. Its resistance to bending rises roughly with the cube of its thickness. Double the blade thickness and it becomes about eight times harder to deflect, not twice. That single relationship explains why a "small" thickness change during sampling can turn a tool that felt right into one that feels like a credit card. It is also why the industry thickness bands we publish for moulded silicone are expressed as ranges rather than values — around 1 mm for parts that must stay flexible, 1.5 mm and above where a firm, pronounced form matters. The comparison is documented in our own note on how thickness drives stiffness in moulded silicone parts, and the same physics applies to a spatula blade.
What Happens When a Silicone Spatula Is Too Soft or Too Stiff?
A blade that is too soft collapses under its own load. The edge rolls over, the product gathers in the middle of the blade, and the user compensates by pressing harder — which is exactly how product gets pushed into the hairline and the eye contour.
A blade that is too stiff behaves like a scraper. It bridges the cheekbone instead of following it, so the user tilts the tool and applies the load on one corner. On a curved surface that corner is a stress concentration, and it is where the first tear appears.
The third failure is the one people miss: a blade that is inconsistent along its length. If the tip is soft and the root is stiff, the bend line moves as the user changes angle, and the tool feels unpredictable without anyone being able to say why.
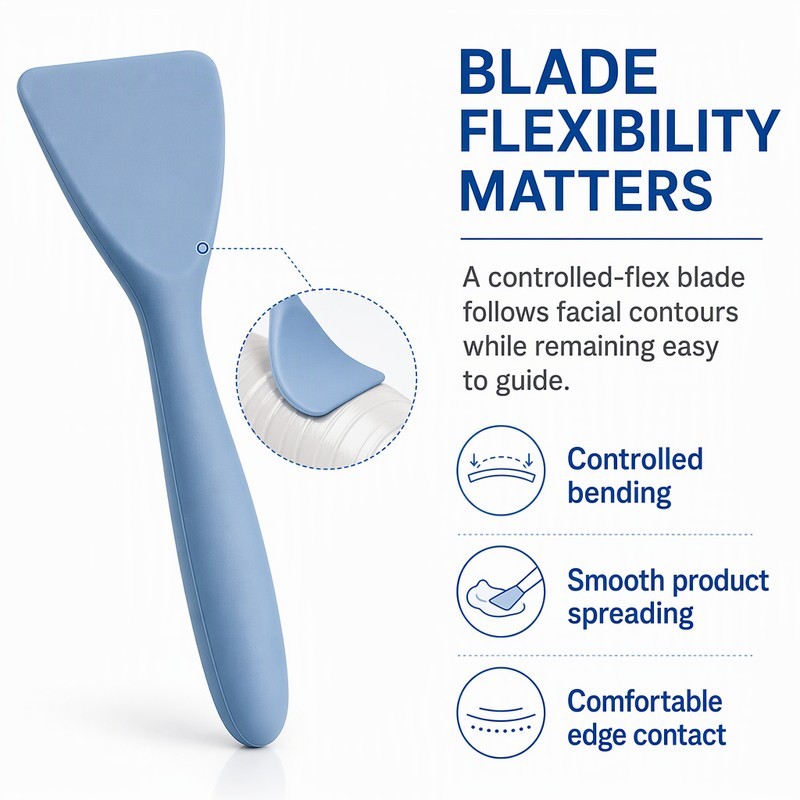
The practical target is not "soft" or "firm". It is a blade that deflects progressively: easy at the start of the stroke, stiffer as it loads. You get that by varying section thickness along the blade, not by changing hardness alone.
For brands building out a beauty tools line, this is also why a spatula cannot be specified from a photo. The useful conversation is about stroke, product viscosity and how much feedback the user should feel. Our notes on why makeup artists add silicone tools to their kits cover the use side of that question; the design side starts with section thickness.
How Should Blade Edge Thickness Be Determined?
Why Does a Thin Edge Help with Smooth Product Spreading?
The edge is the only part of the tool that touches both the product and the skin. A thin, rounded edge creates a small contact area and a controlled gap, so the product is drawn out into an even film instead of being pushed ahead in a ridge. It also lets the user finish a stroke at the jawline without a visible step.
There is a second effect that matters for opaque masks: a thin edge can be pressed almost flush, so the film thickness at the boundary is set by pressure rather than by the tool's own thickness. That is what makes a clean edge possible at all.
What Problems Can Occur When the Edge Is Too Thin?
Below a certain section, the edge stops being a spreading edge and becomes a tear initiator. Silicone has good elongation but modest tear strength, and tear strength falls sharply as section thickness drops. The mechanism is well documented in our teardown of tear failure at thin silicone wall sections: the crack does not start where the part is loaded, it starts where the section is thinnest.
In a spatula the symptoms are specific. A feathered edge develops a wavy lip after a few weeks of washing. A nick at the corner propagates across the blade. And during moulding, a very thin edge is the last place to fill and the first place to flash, so the parts that survive use are not the parts that come out of the tool consistently.
Thin edges also fail in a quieter way at the parting line. When the edge collapses to a knife profile, the steel has almost no land to close against, and flash control becomes a deflashing problem rather than a mould problem. Our case study on edge thinning and its failure pattern describes the same progression in a different product family.
How Should the Edge Transition into the Main Blade Body?
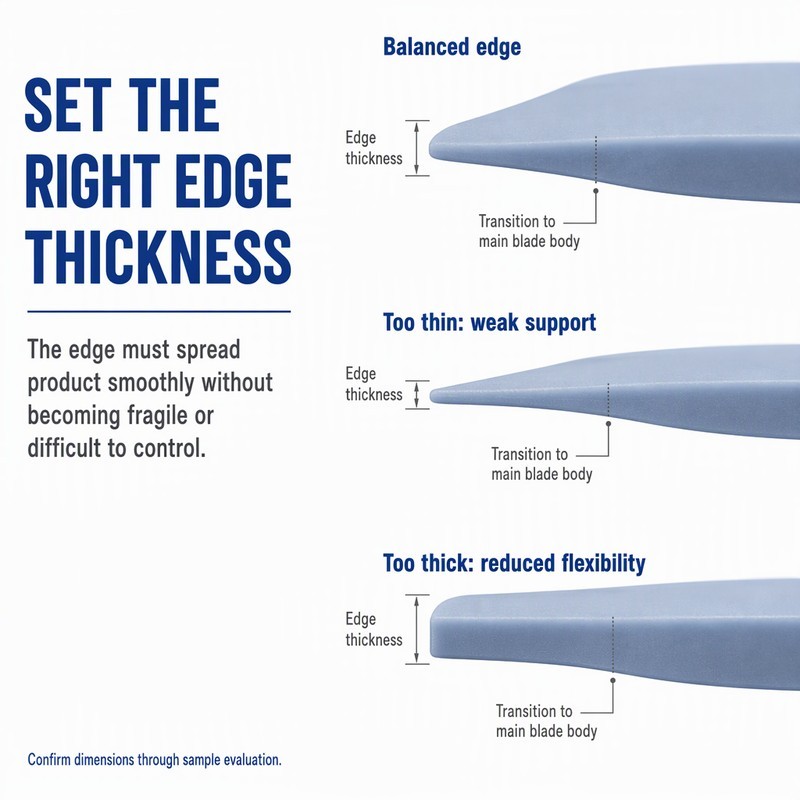
This is where most designs are won or lost, and it is rarely on the drawing. The transition from edge to body should be a continuous taper with a generous radius, not a step. A step doubles as a stress riser and as a flow restriction: rubber arrives at the thin section already partly cured, and the knuckle that forms there is a permanent weak point.
A practical rule we use in design review: the taper should be long enough that no two adjacent sections differ by more than a small fraction of the local thickness. It costs a little more material and adds nothing to the cycle time, and it removes the hinge that otherwise forms exactly where users bend the tool.
Three edge profiles, one decision. The balanced profile spreads product and survives handling; the thin one loses support; the thick one stops following the surface. Note that the failure is not in the thickness number itself but in how quickly the section changes.
When a brand sends us a sketch, we redraw the edge as a section rather than a plan view before quoting. It is the only way to see whether the taper is real or whether the drawing has a step hidden in a radius callout.
How Do Blade Shape and Overall Dimensions Affect Performance?
Should the Blade Be Flat, Curved, or Slightly Tapered?
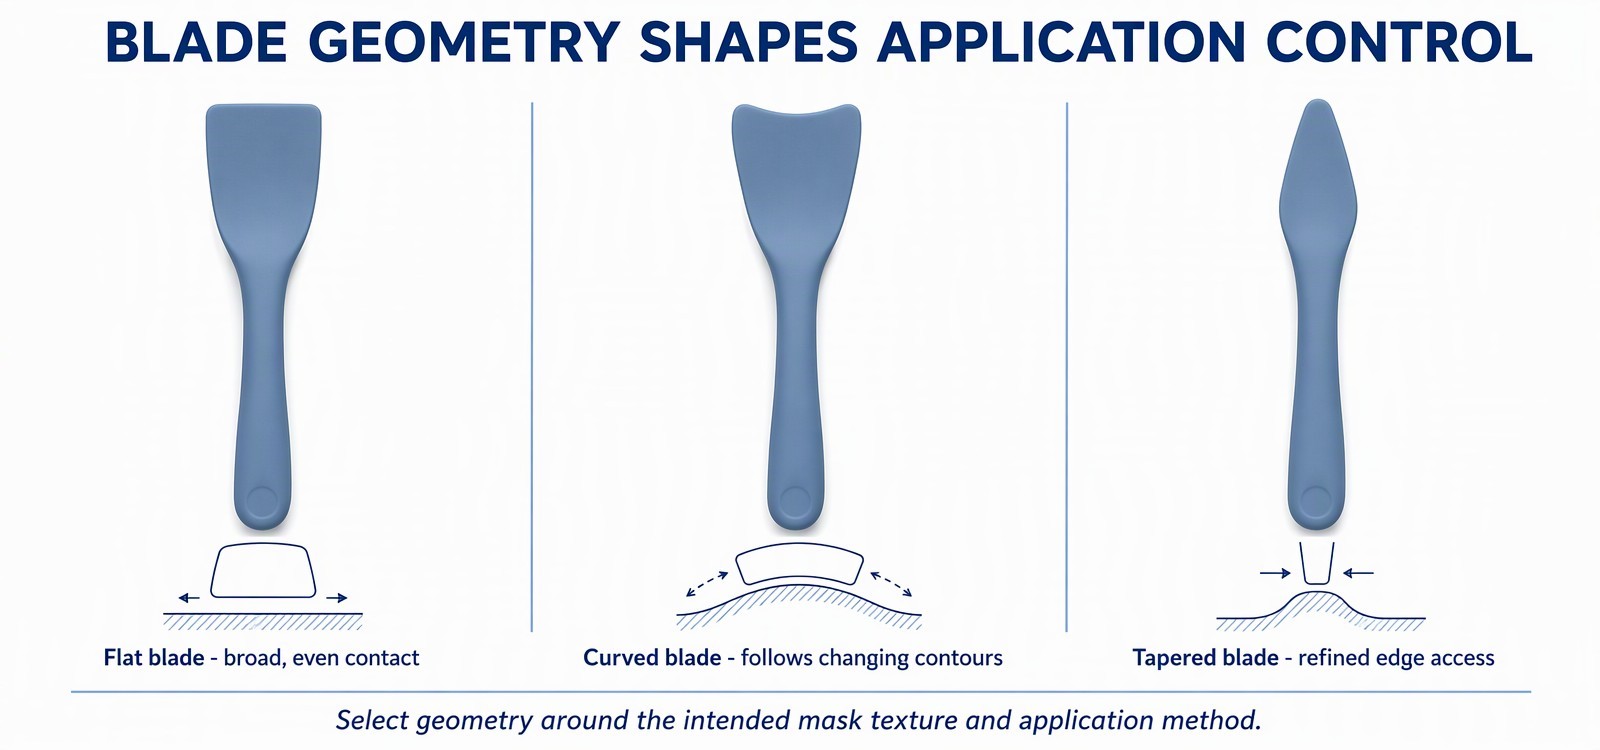
Flat blades give the most even film on flat areas and the least control on curves. Curved blades follow a cheek or a forehead but tend to trap product in the concavity. Tapered blades reach the nose fold and the under-eye area but load less product per pass.
The choice is really a choice about which failure the brand can live with. A mask applied by a consumer in front of a mirror wants a flat blade with a softened edge. A professional treatment wants a shorter, tapered blade so the therapist can work around the eye without loading a full blade.
One detail that is almost never specified but always noticed: blade width relative to the container opening. A blade wider than the jar mouth forces the user to load from the rim, which is where contamination starts.
How Does Handle Length Affect Application Control?
Handle length sets the lever arm. A long handle gives reach and a light touch at the tip; it also amplifies any wobble, so the blade has to be stiffer to compensate. A short handle gives control but puts the fingers close to the product.
For a one-piece moulded tool the constraint is practical: the handle has to be thick enough to demould cleanly and thin enough to feel like a tool rather than a stick. We normally set the handle section from the minimum wall that still fills, then check the balance point with the blade loaded, not empty.
What Silicone Material Properties Should Brands Evaluate?
How Does Silicone Hardness Influence Blade Performance?
Hardness changes how the material distributes stress, not just how soft it feels. A harder compound resists compression and returns faster; a softer one conforms but creeps under sustained load. On a thin blade, the difference shows up as the difference between a tool that springs back and one that stays slightly bent after a heavy stroke.
There is no universal number. A 40 Shore A compound in a 1.2 mm blade can feel firmer in use than a 60 Shore A compound in a 0.8 mm blade, because geometry dominates. The selection logic we describe for choosing between 40 Shore A and 60 Shore A applies here too: fix the geometry first, then use hardness for fine tuning.
How Should Material Selection Balance Flexibility and Shape Recovery?
Recovery is the property users describe as "it still looks new". It depends on compression set and on how far the material is strained in normal use. A blade that is bent past its elastic range on every stroke will take a set, and a set blade spreads unevenly for the rest of its life.
So the material question is not "how soft" but "how much strain will this geometry see". If the answer is high, either the geometry has to give more compliance or the compound has to tolerate more strain. Choosing a softer compound to fix a stiff geometry usually moves the problem to recovery instead of solving it.
Food-contact and skin-contact requirements sit on top of this. For tools used with leave-on products, the cure system and post-cure matter as much as hardness, and they need to be settled before the mould is cut rather than after. Our overview of silicone palettes used for mixing cream and foundation covers the same material questions from the mixing side.
What Should Manufacturers Check Before Opening the Mold?
How Can Blade Thickness Variations Affect Molded Parts?
Compression moulding fills by flow, and flow follows the path of least resistance. A blade with a thin edge and a thick root fills from the root outward, which means the edge sees cooler, stiffer rubber. The result is a part that measures correctly on the bench and feels different at the tip.
Two checks catch this before steel is cut. First, a flow simulation or an experienced read of the section map: is there a path from the gate to the thinnest section that stays above the minimum section for the compound? Second, a prototype tool. A single-cavity prototype in a smaller frame is the cheapest way to see whether the edge fills and releases, and it is a different tool from the production mould by design rather than by compromise — the distinction is set out in our note on prototype versus production moulds.
Which Design Details Should Be Confirmed During Sample Development?
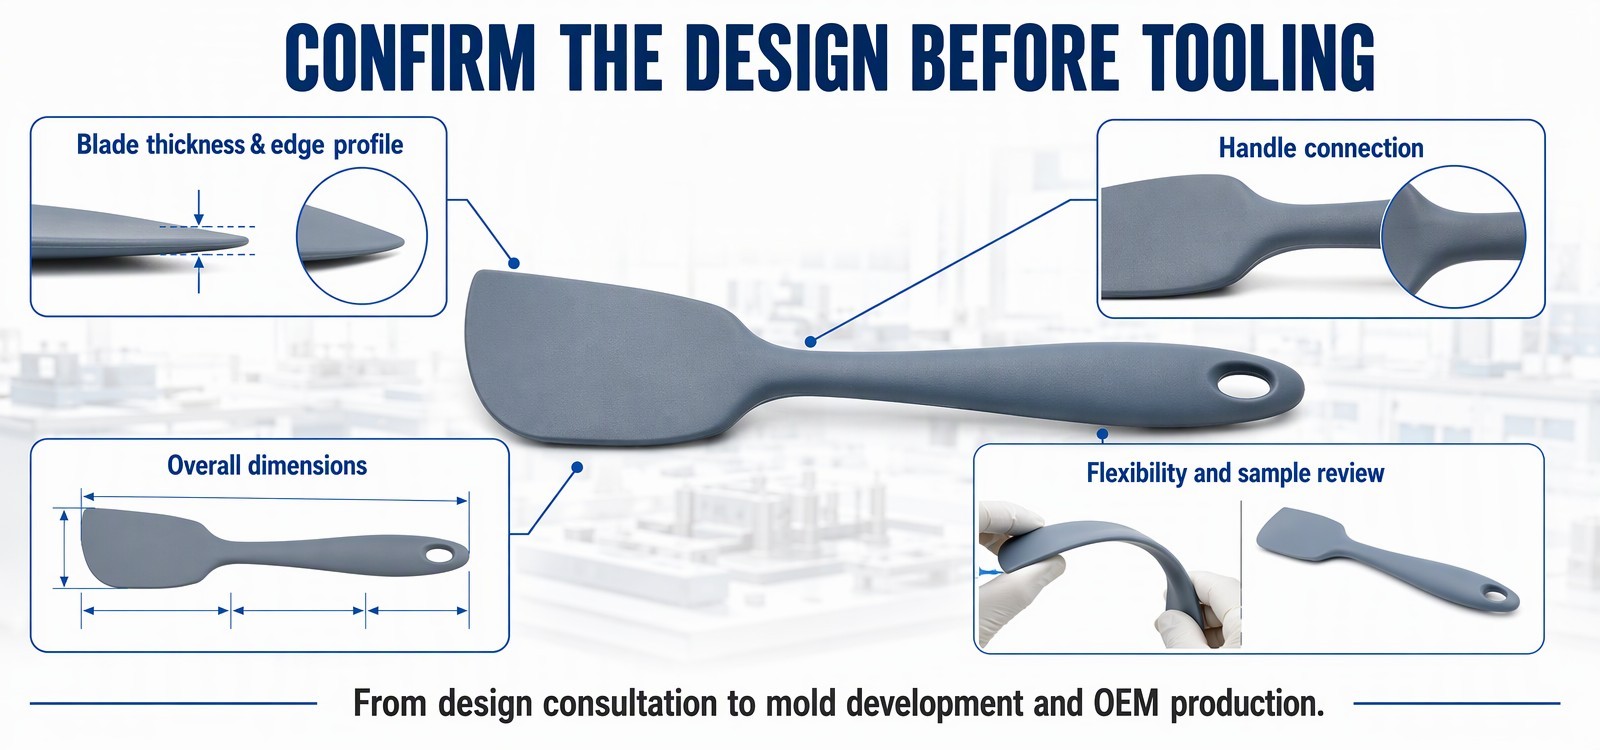
Five things, in this order: blade thickness at three points along the length, the edge profile as a section, the neck transition, overall length and width, and surface finish on the working face. Flexibility is checked last, because it is the result of the other four.
The drawing itself is usually the weak link. If the thickness callout sits on a single view, the toolmaker will read it at the section line and nowhere else. Our guide to reading a silicone product drawing covers the callouts that are most often misread on thin parts.
How Can Brands Develop a Custom Silicone Mask Spatula?
Which Details Should Be Included in an OEM Design Brief?
A brief that gets a usable quote back contains: a dimensioned drawing or a measured sample, the target flexibility described in words rather than a hardness number, the edge requirement, the compound and colour, logo position and method, surface finish, and the packaging format. If the product will be sold as a set, the other components belong in the same brief, because matching dimensions across a kit is a design task rather than a purchasing one.
Where a brand has no drawing, a measured physical sample is enough to start. We have built tools from samples for clients who had nothing else, and the limitation is not the tooling — it is that every unstated dimension becomes a decision the toolmaker makes on the brand's behalf.
Why Should Brands Evaluate Samples Before Mass Production?
Because the properties that matter are not visible on a specification sheet. A sample in the hand answers questions a drawing cannot: does the edge load product, does the blade return, does the neck feel like a hinge. It also exposes the gap between a prototype and a production cavity, which is where most "the sample was perfect" conversations start.
We usually ask for two rounds. The first confirms geometry, the second confirms the production tool. Brands that skip the second round tend to discover the difference after the containers are printed.
Where the design effort actually goes
Most of the value in a silicone mask spatula is created before any steel is cut, in three decisions: how thick the blade is along its length, how gently the edge transitions into the body, and how the hardness interacts with that geometry. Tools that feel expensive are not made from exotic compounds. They are made from sections that were drawn properly and then checked on a real face with real product.
FromRubber has been moulding custom silicone parts in Dongguan since 2010, with toolmaking, sampling and production in house. If you are developing a mask spatula, a spatula-and-bowl set, or a brush tool with the same structural questions, the fastest start is a drawing or a sample and a description of how the product should feel in use. Message our team on WhatsApp or WeChat at +86 18676210913 and we will review the section with you before quoting.
Sources and further reading
- How thickness controls stiffness in moulded silicone parts — FromRubber technical FAQ, including typical moulded and printed thickness bands.
- Tear strength at ultra-thin silicone wall sections — FromRubber engineering article on thin-section failure and mould design.
- Failure patterns caused by edge thinning — FromRubber case study.
- Selecting silicone hardness: 40 Shore A and 60 Shore A — FromRubber material selection guide.
- Reading a silicone product drawing — FromRubber guide to dimensions, tolerances and GD&T symbols.
- Prototype mould and production mould — FromRubber technical FAQ.