Why Do Silicone Buttons on Portable Megaphones Feel Too Hard to Press?
A portable megaphone comes back from a field trial with one complaint: the buttons are too hard to press. The usual first move is to ask the silicone supplier for a softer compound. In a good number of cases that change does not fix the complaint, and occasionally it makes the keypad worse, because the resistance a thumb feels is produced by the whole button structure, not by one material property.
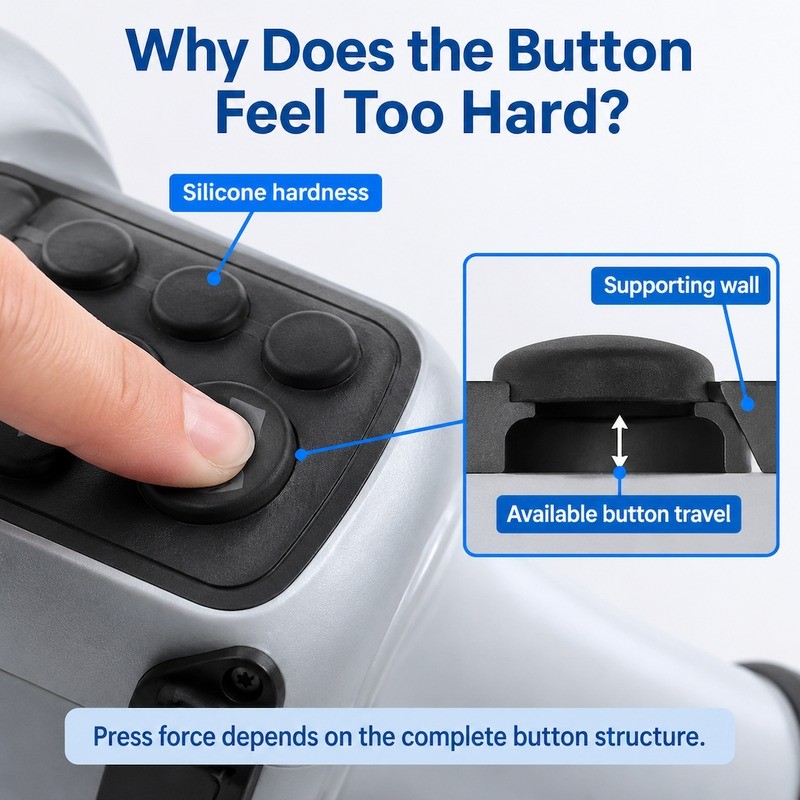
Excessive pressing force on megaphone silicone buttons usually comes from four things acting together: the elastic modulus of the silicone, the thickness of the supporting wall under the cap, the amount of free travel available before the conductive pill reaches the PCB, and the stiffness of the connecting web around the button. Hardness is only one input. If the travel is short and the wall is heavy, a softer compound changes the feel very little and can reduce the force that returns the button after release.
Why Do Megaphone Silicone Buttons Require Too Much Pressing Force?
A megaphone is operated in the worst possible conditions for a small keypad. The user is holding the device at chest height with one hand, often wearing a glove or holding a microphone in the other hand, and pressing the talk button while speaking. The thumb approaches the panel at an angle, not straight down. Under those conditions a force that feels acceptable on a bench with an index finger feels heavy in the hand, and a short travel stroke feels like the button has not moved at all.
That is why pressing complaints rarely match the numbers on a force gauge. A single button measured on a flat fixture can sit inside a normal range and still be rejected by users, because the measurement does not include the angle of approach, the stiffness of the plastic panel the keypad sits in, or the way the user's thumb rolls across the cap.
Before changing material, we separate the complaint into three questions: how much force is needed to close the contact, how far the cap moves before that happens, and how much of that movement the user can actually feel. Often only one of the three is out of balance.
Silicone Hardness Is Not the Only Factor Behind a Stiff Button
Hardness describes how far a defined indentor penetrates a cured silicone sample under a defined load, which is exactly what the durometer method in ISO 48-4 measures. It is a useful incoming-inspection number, and we test it on every batch of compound for that reason. It does not describe a molded button, because a molded button is not a solid block of material. It is a thin shell with a cap, a wall, an open cavity and often a conductive pill bonded underneath.
Two keypads molded from the same 60 Shore A compound can differ by a wide margin in operating force if their wall sections differ. The compound sets the modulus of the material; the geometry sets how much material the finger has to bend, and in which direction. A thick, short wall puts the material into compression early. A thinner, taller wall lets the cap tilt and collapse progressively, which distributes the same total displacement over a longer, lighter stroke.
This is also why "just use a softer grade" is an unreliable instruction. Lower hardness reduces the force needed to deform a given section, but it also reduces the force that pushes the cap back. When the return force falls below the friction and adhesion in the assembly, the button starts to feel mushy or stays partly depressed, and the user reports a different defect on the next build.
Thick Button Walls and Short Travel Increase Pressing Resistance
Wall thickness is the most common cause we find in keypads that are "hard but not stiff". The wall is the short cylindrical or conical section that connects the cap to the base membrane. It acts as the spring. Making it thicker raises the force needed for the same deflection roughly in proportion to the change in section stiffness, and it also narrows the space the wall can buckle into.
Travel is the second half of the story. The cap has to move far enough for the conductive pill to touch the PCB pad with a reliable contact force. If the gap between the pill and the pad is already small, the designer shortens the stroke, and the user gets a button that clicks almost immediately with no perceptible travel. The contact may be electrically fine and still be judged unacceptable in the hand.
There is a third, less obvious constraint: clearance under the cap. If the cavity below the button is shallow, the inside of the cap bottoms out on the PCB or on the housing before the wall reaches its designed deflection. At that point the finger is pressing against the PCB through the silicone, and the force rises steeply. This shows up as a button that is smooth for the first part of the stroke and then suddenly immovable.
How Does Button Geometry Affect the Pressing Force?
Geometry decides how the displacement is distributed. The cap, the wall, the base membrane and the web that links neighbouring buttons form one continuous elastic body, and changing any of them changes the force curve of every button on the sheet.
A tall cap with a thin wall behaves like a short column that buckles sideways. The force rises slowly, peaks, then drops as the wall snaps through. That snap is what users read as a tactile click. A short, thick button behaves like a block in compression: the force rises steadily with almost no snap, and the user has to push harder to be sure the contact has closed.
The same effect appears at panel level. A keypad with a heavy outer frame and thick webs holds each button more rigidly, so the individual cap cannot tilt. The design feels solid and is easy to mold, but the operating force climbs because the finger is now deforming the frame as well as the button.
Button Height and Wall Thickness Change the Deformation Behavior
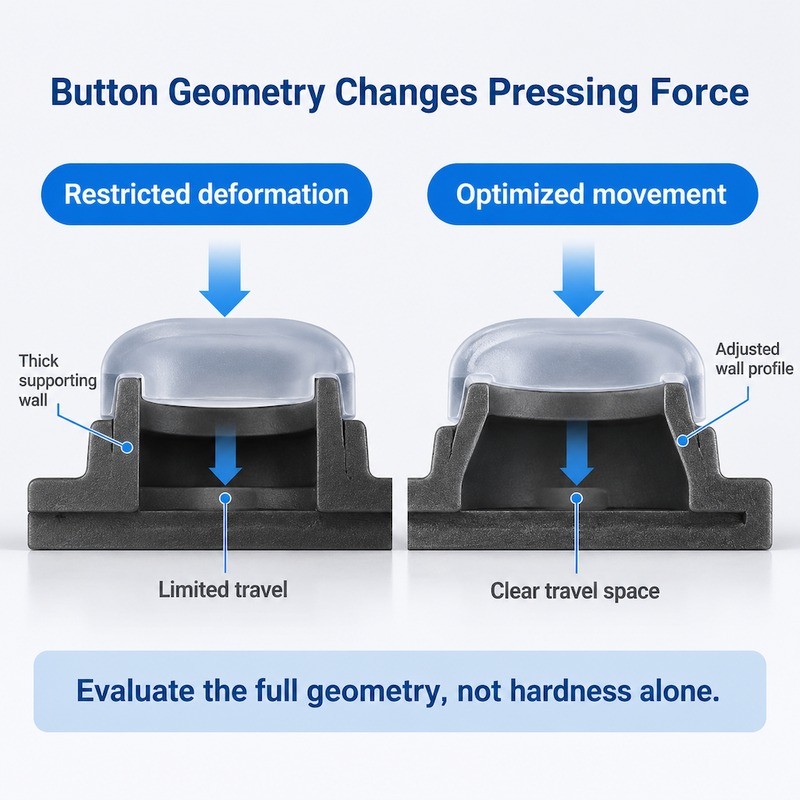
Height gives the wall room to bend. As the cap is pushed, the wall rotates about its base; the taller the wall, the smaller the angle needed for a given vertical displacement, and the lower the force at that displacement. This is why raising a button by a small amount often reduces operating force more effectively than changing compound, as long as the cap still sits correctly in the housing opening and does not become unstable sideways.
Wall thickness sets the bending stiffness of that same section. It is a cubic relationship in classic beam theory, so a modest increase in wall thickness produces a disproportionately large increase in force. In practice this means the wall should be treated as a tuned spring, not as a structural member to be made as thick as the mold will allow.
A rigid support underneath defeats the purpose. If the base membrane is thick and fully backed by the housing, the wall has nothing to deflect into and the button becomes a pillar. Some designs need that rigidity for impact resistance; the trade-off has to be decided on the product, not by default.
Supporting Webs and Button Spacing Can Make Pressing Less Comfortable
On a compact megaphone panel the buttons sit close together, and the web between them is often the thinnest feature on the part. A thin web is good for independent movement and bad for tear strength and demolding. A thick web is the reverse. When the web is too heavy, pressing one button pulls the adjacent buttons down slightly, and the user feels a resistance that belongs to the neighbouring key.
Narrow spacing adds a second problem. The thumb contacts two caps at once, so the applied force is shared, and the user has to press harder to be certain that the intended switch has closed. This is not a material issue at all. It is a layout issue that shows up as a force complaint, and it can only be fixed by changing the pitch, the cap diameter or the height difference between adjacent keys.
Our rule of thumb during review: if the force problem appears on one button only, look at that button's geometry. If it appears on a group of adjacent buttons, look at the web and the spacing before touching the compound.
How Can Silicone Hardness and Button Structure Be Adjusted Together?
Material and structure have to be evaluated as a pair, because each can compensate for the other and each can also hide the other's defect. A softer compound will mask a heavy wall on the bench and then fail in the field when the return force drops. A lighter wall will mask a hard compound until the keypad is assembled into a stiff housing that adds its own resistance.
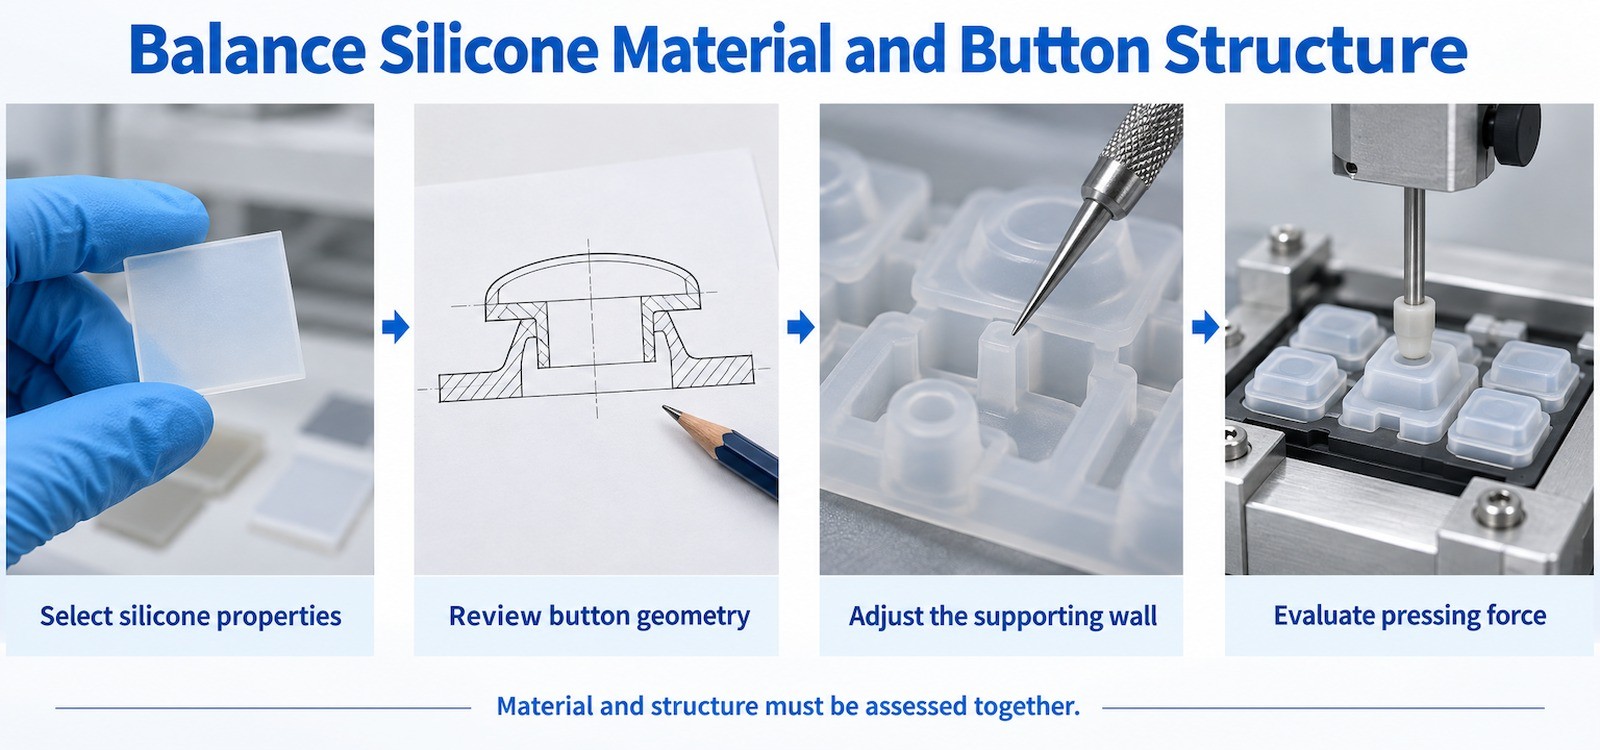
Select Silicone Hardness Based on the Required Operating Force
Start from the force the product needs, then choose a compound that can deliver it with the geometry the housing allows. For a handheld device operated by thumb, designers usually want a light, progressive stroke with a clear tactile event at contact; for a panel that must survive impact or a gloved industrial user, a firmer stroke with a defined wall is often more appropriate. Neither target can be written as a single hardness value across products.
During prototyping we mold the same geometry in two or three hardness grades and compare force curves on the same fixture. That comparison is more informative than any single datasheet figure, because it shows how much of the total force is material and how much is structure. If the two grades differ only slightly, the geometry is dominating and the compound should not be changed further.
Compression set matters as much as hardness here, and it is measured to ISO 815-1 rather than estimated from a durometer reading. A compound that is soft but takes a set under continuous load will lose its return force after the device has been stored with the buttons depressed by packaging or a carrying case. The relevant material tests are named in the section on verification below.
Optimize the Supporting Wall Instead of Making the Entire Keypad Softer
Local change is usually better than global change. Reducing the wall section on the two or three buttons that carry the complaint leaves the rest of the keypad, its tear strength and its molding behaviour intact. Softening the whole sheet affects every button, changes the return force everywhere, and often forces a second round of tooling anyway.
The usual adjustments are: reduce wall thickness at the base where the bending moment is highest, increase the free height of the wall, add a small relief radius at the junction between wall and base to avoid a stress concentration, and open the cavity under the cap so the wall has somewhere to go. Each of these lowers force without changing compound. The trade-off is stability: a wall that is too thin will lean sideways under an angled thumb press and can rub against the housing opening.
When the button must also carry a conductive pill, the geometry has to keep the pill square to the PCB at contact. A wall that is very light can tilt enough to close the contact on one edge first, which produces intermittent operation on a panel that passes a static force test.
| Design variable | What it changes mechanically | Typical symptom | What to review |
|---|---|---|---|
| Silicone hardness | Elastic modulus of the compound, and therefore both press and return force | Whole keypad feels heavy or, after softening, slow to return | Force curve of two grades on the same geometry |
| Supporting wall thickness | Bending stiffness of the spring section under the cap | One or two keys noticeably stiffer than the rest | Wall section at the base, relief radius, draft |
| Free travel and cavity depth | Distance available before contact and before bottoming out | Button clicks instantly, or becomes immovable halfway | Pill height, PCB pad height, cavity clearance |
| Web and button pitch | Independence of adjacent buttons and shared load on the thumb | Neighbouring keys dip when one is pressed | Web thickness, cap spacing, height offset |
| Conductive pill and contact design | Force needed to reach a stable contact resistance | Firm press required before the function registers | Pill hardness, contact area, pad layout |
How Should Manufacturers Test Pressing Force Before Mass Production?
Testing has to reproduce the way the product is used, and it has to cover every button rather than a representative one. On a megaphone panel the buttons differ in size, in what sits beneath them and in how much housing material surrounds them, so their force curves differ too.
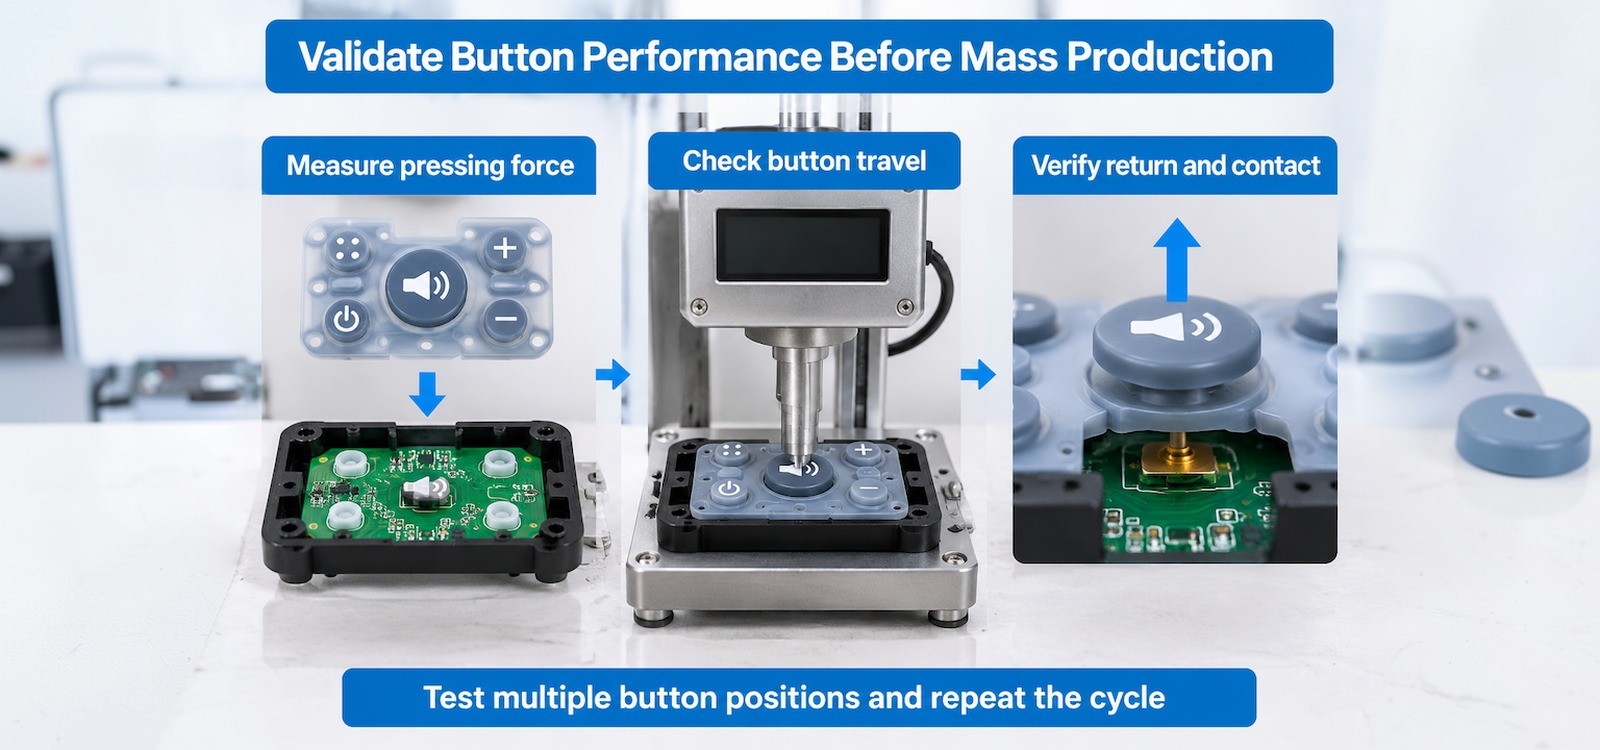
Measure Operating Force and Button Travel on Each Key
A simple motorised test stand with a flat probe and a load cell is enough. The keypad should be mounted in its real housing, or in a fixture that reproduces the housing's support, because a keypad measured loose on a bench will read lower than the same part assembled. The probe should approach perpendicular to the cap and travel at a slow, constant speed so the recorded peak is comparable between builds.
Record two values per button: the force at the moment of contact closure, and the peak force before the wall bottoms out. The first is what the user has to apply to make the function work. The second is what the user feels at the end of the stroke. A large gap between them means a long, soft stroke; a small gap means a short, hard one.
Plot the results across the panel. A spread of more than a small percentage between buttons on the same sheet points to a geometry or molding problem rather than a compound problem, and it will be felt by the user even if every individual button is inside its own tolerance.
Check Button Return, Electrical Contact, and Repeated Pressing Performance
Return is measured after release: the cap should come back to its original height within a defined time, and the contact should open. A button that returns slowly will eventually be reported as sticking, especially in cold conditions where silicone stiffens.
Contact has to be checked at the same time. The conductive pill must reach the PCB pad with enough force to break through surface film and hold a stable resistance, and it must do so without the user having to press to the bottom of the stroke. Measuring resistance against applied force produces a curve that shows exactly where the contact becomes reliable, and that point should sit comfortably inside the designed travel.
Repeated pressing is the last gate. A few thousand cycles on the buttons that are used most will expose a wall that fatigues, a pill that migrates, or a web that tears at the corner. It is cheaper to find those at prototype stage than after the mold is cut, and it is the reason we keep a press-fatigue fixture in the same room as the tooling bench.
What Should OEM Buyers Confirm Before Ordering Custom Megaphone Silicone Buttons?
Most pressing-force disputes start with information that was never exchanged, not with a manufacturing error. The items below are the ones that change the outcome of a first mold, so they are worth settling in writing before tooling starts.
| Item to confirm | Why it decides the pressing feel | What to supply |
|---|---|---|
| Target operating force and acceptable range | Sets the design target for wall section and compound | A force figure per button type, and how it will be measured |
| Silicone hardness and material grade | Fixes the modulus and the return behaviour | Hardness range, colour, any food-contact or flame requirement |
| Button height, wall thickness and travel | Determines the shape of the force curve | 2D section or 3D model, plus the housing opening dimensions |
| PCB contact structure | Sets how far the cap must travel to close the circuit | Pad layout, switch height, whether a conductive pill is used |
| Housing support under the keypad | Adds or removes resistance at the base of the wall | Housing drawing or a physical sample of the front panel |
| Prototype and production validation | Defines when the design is accepted | Sample quantity, test method, and who signs off the feel |
How Can a Custom Silicone Button Manufacturer Improve Button Pressing Performance?
The manufacturer's contribution is not limited to molding to a drawing. A useful supplier reads the drawing against the housing and the PCB, flags the sections that will produce a heavy or short stroke, and proposes geometry changes before the tool is cut. That review is where most of the pressing feel is actually decided.
At FromRubber, keypads are developed in a plant that also makes the molds, prints the legends and inspects the parts, so a wall change can be tested on a new cavity without waiting for an outside toolmaker. We routinely evaluate two or three wall sections in the first sample round and measure them on the same fixture, which turns a subjective "too hard" comment into a specific section change. Our custom silicone rubber keypads page shows the range of constructions we mold, and the custom silicone button customization page covers the OEM and ODM options in more detail.
What We Ask For at the Start of a Pressing-Force Project
A housing drawing or a physical front panel, the PCB pad layout, the button functions and the force target are enough to start. If no force target exists yet, a sample of the current keypad plus a note on which buttons are complained about is more useful than a specification, because it lets us measure the existing curve and work from it. For projects that need a fast first look, the quick proofing service is the usual route.
Material selection follows the same logic. The silicone material page lists the compounds we stock and the properties we test at incoming inspection, including hardness to ISO 48-4, tensile strength and elongation to ISO 37, and colour stability. Compounds are chosen against the application, not against a single hardness number.
Frequently Asked Questions
Does a softer silicone always make a megaphone button easier to press?
No. It lowers the force needed to deform the button, but it also lowers the force that returns it. If the wall is heavy and the travel is short, the user still feels a hard stop, and the button may return slowly. Geometry should be reviewed first when the complaint is limited to specific keys.
Can pressing force be changed without cutting a new mold?
Sometimes. Trimming flash, opening a cavity, or changing the compound can shift the feel within a small range. A change to wall thickness or button height requires a tooling change. It is worth measuring the current curve first, because a compound change is wasted if the limit is mechanical.
Why do the buttons on one keypad feel different from each other?
Usually because the geometry is not actually identical: different cap sizes, different cavity depths, or different amounts of housing support beneath each button. Molding variation in wall thickness can add to it. Measure every position before assuming the compound is inconsistent.
How is pressing force specified on a drawing?
As a force at contact closure plus a permitted range, measured on a defined fixture with a defined probe speed, with the keypad installed in its housing. Without those conditions the number cannot be reproduced by another lab.
What causes a button that clicks but does not register?
Usually insufficient contact force at the PCB pad, or a pill that is not square to the pad. The cap may travel and snap, but the conductive path is marginal. Resistance-versus-force measurement shows where the contact becomes stable.
Sources and verification notes
- FromRubber technical article: how silicone keypad hardness affects button force.
- FromRubber technical article: how button height affects keypad assembly.
- FromRubber keypad FAQ: silicone keypad questions.
- Standard designations referenced for orientation only, by name: ISO 48-4 (rubber hardness), ISO 37 (tensile stress-strain), ISO 815-1 (compression set). The applicable edition and test method should be confirmed with your test house.
The relationships described here come from keypad design reviews and prototype measurements carried out during custom development projects. Values are not quoted as universal specifications, because the correct wall section and force target depend on the housing, the PCB and how the product is held.
If you are working on a megaphone or voice amplifier keypad and the current buttons are being rejected on feel, send the housing drawing, the PCB layout and a sample of the existing part. We will measure the force curve and tell you whether the fix is in the compound or in the wall.
FromRubber, Dongguan Bohao Electronic Technology Co., Ltd.
WhatsApp and WeChat: +86 18676210913. You can also reach the engineering team through the contact page.