How Does Silicone Keypad Button Height Affect Access Control Panel Assembly?
An access control panel is a stack of rigid parts and one soft part. The front housing, the PCB and the back plate all hold their shape; the silicone keypad does not. That single difference decides where the tolerances go, and it explains why a keypad that measured perfectly on the bench can sit low, sit high, or hold a switch permanently closed once four screws are tightened.
The useful way to read an assembly complaint is to stop treating the keypad as a part and start treating it as the compliant element in the stack.
Reviewed by FromRubber keypad engineering · November 2026
Why Is Button Height Important for Access Control Panel Assembly?
Access control panels are usually flat, wall-mounted and operated with a single finger, often in a hurry. The keypad is protected by a front housing with individual openings or a single window, and the whole front is expected to survive weather and, in commercial buildings, occasional impact.
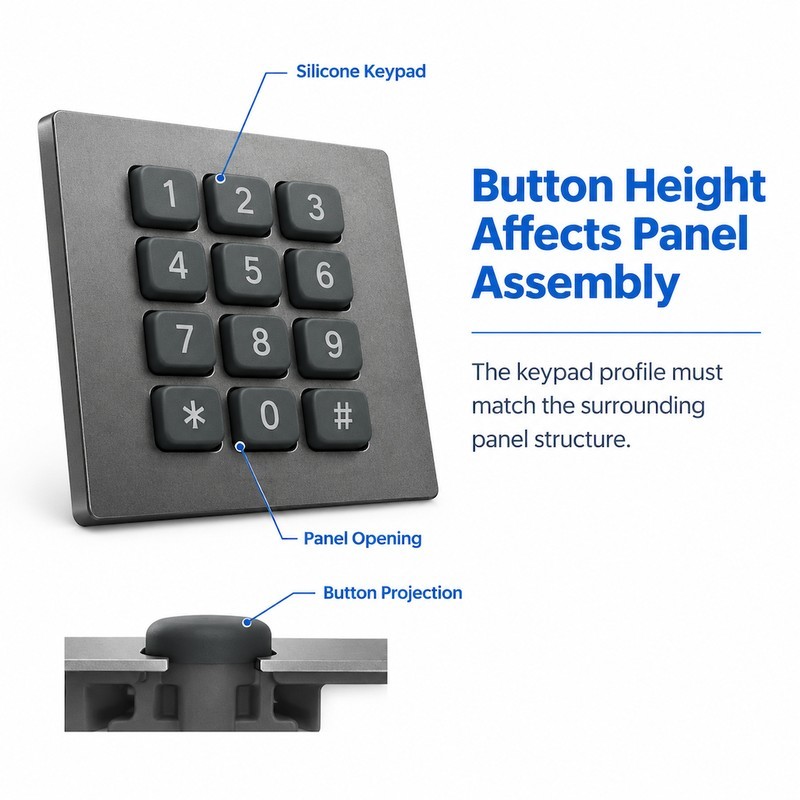
In that arrangement the button has two jobs at once: it must reach through the opening far enough to be found, and it must not press the switch before the user does. Both jobs are decided by projection after assembly, not by the height of the moulded part.
Button Height Determines How the Keypad Sits Within the Panel
The keypad locates on a shelf, a groove or a set of pins inside the housing. If that locating surface is not at the height the drawing assumed, the whole keypad shifts. A shift of 0.3 mm is invisible on the outside and decisive on the inside: it changes both the visible projection and the gap between the key and the switch.
Buttons That Sit Too Low May Be Difficult to Operate
A button below the panel surface is still functional, but the finger has to find a recess before it can press. On a keypad used with gloves, or by someone entering a code in the dark, that recess costs time and produces mis-keys. It also collects cleaning fluid, which is a separate problem on a panel wiped daily.
Buttons That Protrude Too Far Can Interfere With the Enclosure
Too much projection is worse than too little, because the failure is mechanical rather than ergonomic. A key that stands proud of the housing catches on door frames, bags and cleaning cloths, and the web takes the load. Over time the key tilts, the legend wears at one edge, and the switch underneath sees sideways force it was not designed for.
How Does Silicone Keypad Height Affect the Fit Between the Keypad and Panel?
Panel Thickness Changes the Required Button Projection
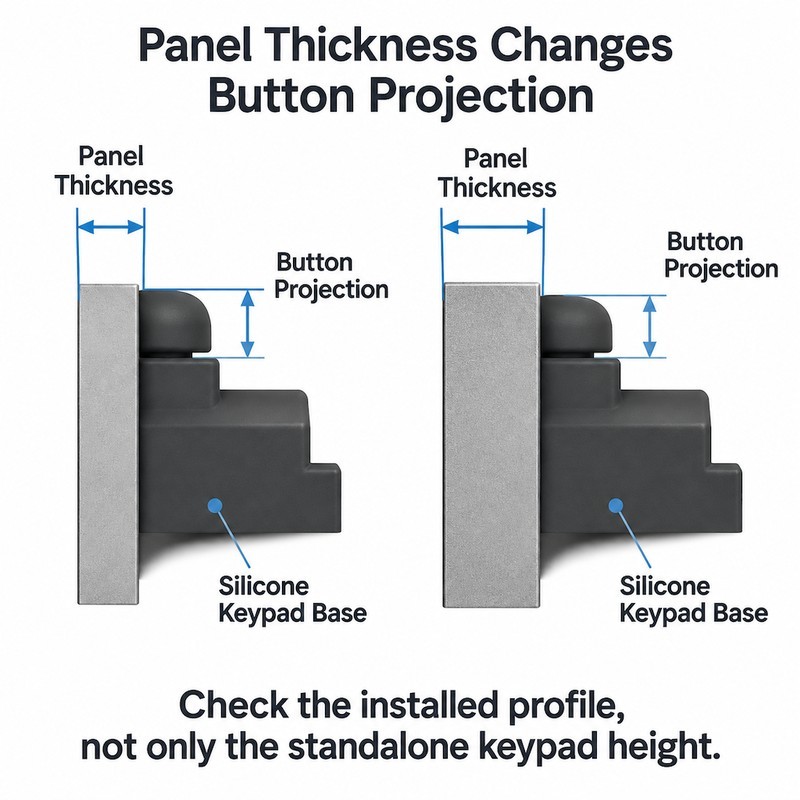
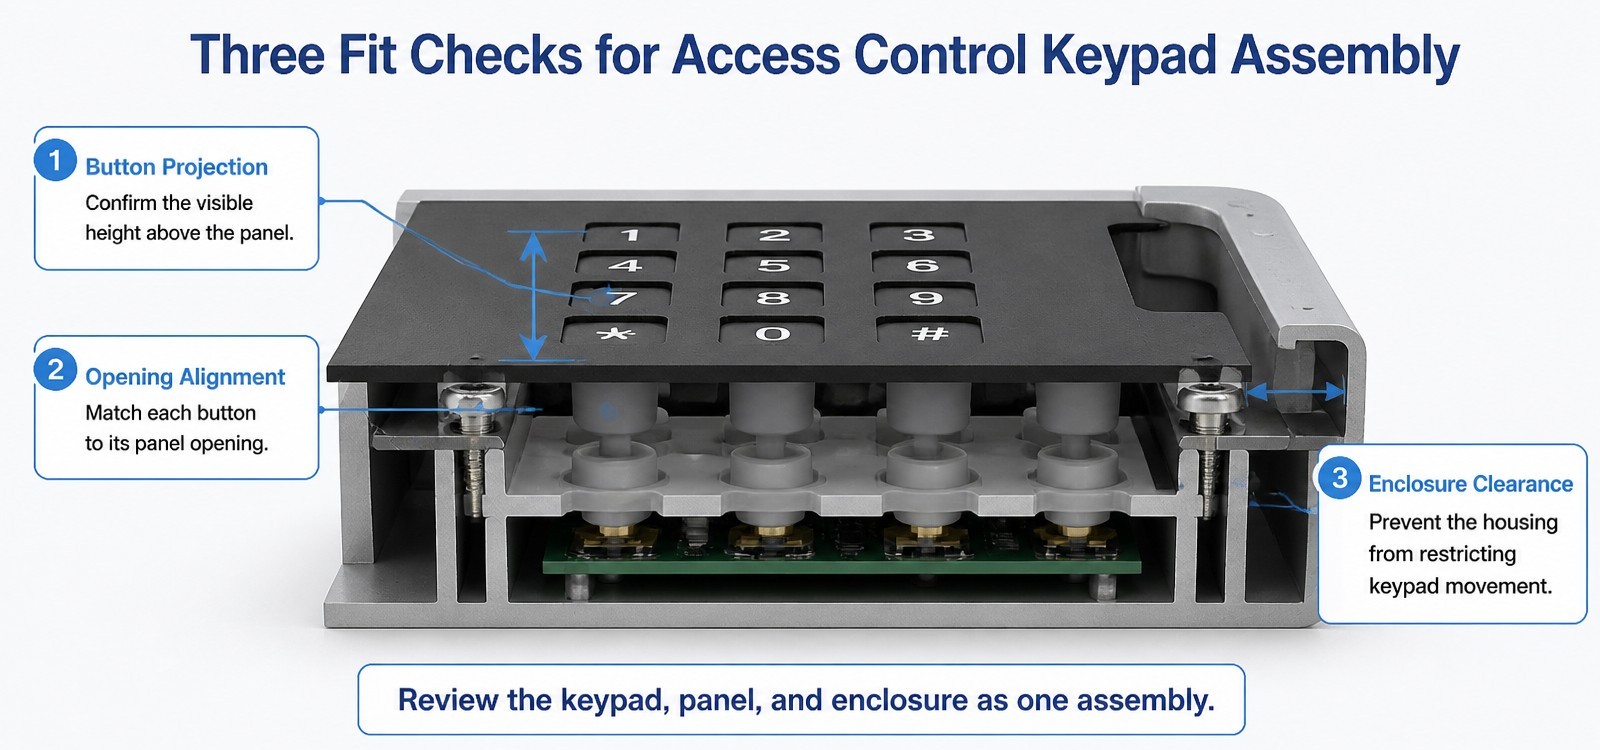
A panel that is 2 mm thick at the model stage may be 2.3 mm after painting and 2.6 mm after a decorative film. Every tenth of a millimetre is deducted from the visible key height. If the housing is shared across two product variants with different front thicknesses, one keypad height cannot serve both.
The practical fix is to dimension the projection from the finished front surface, and to state the panel thickness range the part must tolerate. That is a different drawing note from a nominal key height, and it is the one that survives a finish change.
Incorrect Button Dimensions Can Cause Misalignment With Panel Openings
Height is only one of the two dimensions in the opening. A key that is correct in height but oversized in plan view will rub on one side of its opening when the housing is tightened, because the housing flexes slightly and the opening moves with it. The key then returns slowly on that side, which is often reported as a sticky key rather than an alignment problem. Our notes on a keypad that feels too tight or too loose in the housing follow the same diagnostic path.
Uneven Button Heights Can Make the Finished Panel Look Inconsistent
On a 3 × 4 numeric block, the eye reads the shadow line under the keys as a single straight edge. A variation of a tenth of a millimetre breaks that line, and the panel looks poorly made even when every key works. Cosmetic complaints of this kind are expensive because they appear after the product is assembled, not after the keypad is moulded.
What Happens When Silicone Keypad Height Is Not Matched to the PCB?
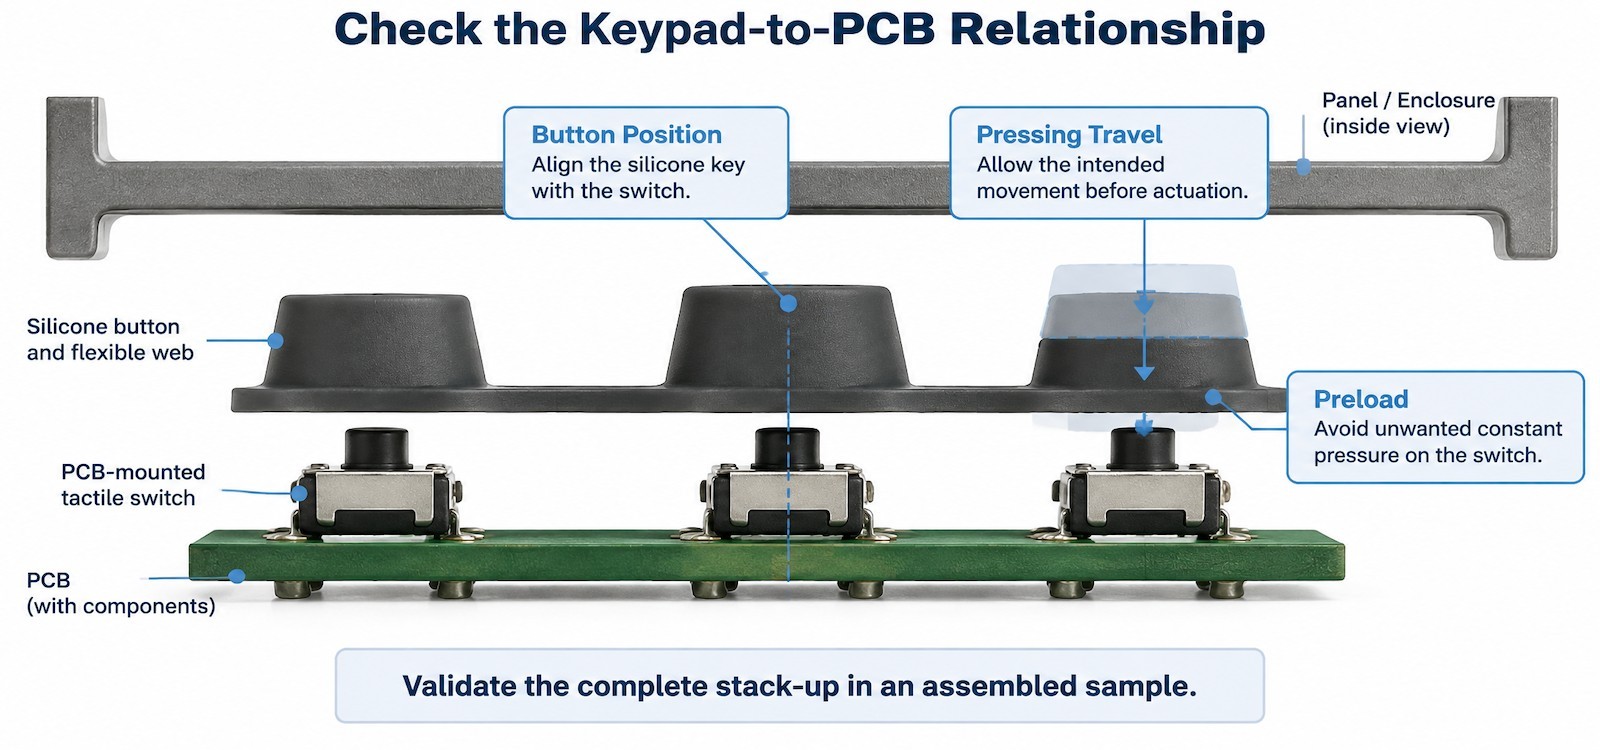
Excessive Button Height May Change the Effective Pressing Travel
A tall key on a short switch does not press further; it simply starts higher. What changes is the over-travel after actuation, which the web has to absorb. If the web bottoms out against the PCB or the housing, the key becomes hard at the end of the stroke and the switch takes the impact instead of the silicone.
Insufficient Travel Can Prevent Reliable Contact With the Switch
When projection is short and the switch sits high, the key may reach the switch only at the very end of its movement, or not at all on the edge of the keycap. The symptom is a key that works when pressed firmly in the centre and fails when pressed quickly or off-centre. On a membrane switch with a metal dome, the same condition produces a key that clicks sometimes.
Excessive Preload Can Cause Continuous Pressure on Internal Switches
This is the failure that ends in a service call. If the keypad is clamped down onto switches that are already at their actuation point, the switch stays closed, the panel reports a permanent key press, and no amount of cleaning fixes it. Preload comes from three places: keypad base thickness, gasket compression, and screw torque on a housing that is not stiff enough to distribute the load.
Compact enclosures make this worse because there is less room for the base to deflect. The integration problems described in compact instrument enclosures are the same mechanism in a smaller space.
- Start from the finished front surface and work down to the PCB.
- Add the four contributors to the stack and check the worst case, not the nominal.
- Confirm side clearance around each key at full stroke.
- Run a switch continuity check before power-up to catch preload.
Which Design Details Help Prevent Silicone Keypad Assembly Problems?
Set Button Height Based on the Complete Panel Assembly
Start from the finished front surface, subtract panel thickness to get the underside, then work down through the keypad base and the switch to the PCB. The key height is the remainder, not the starting point. Designs that start from a key height and adjust the housing afterwards tend to accumulate preload.
Allow for Dimensional Tolerances During Keypad Design
The stack has four contributors: moulded key height, keypad base thickness, panel thickness and PCB height. Each has its own tolerance, and they add in the worst case. A stack analysis that uses nominal values will pass on paper and fail on the line. Where the stack cannot absorb the sum, a compressible gasket or a moulded rib is cheaper than tightening every tolerance.
Review Button Spacing and Enclosure Clearance Together
Keys need clearance on the sides as well as on top. A key that touches its opening wall is being guided by the housing rather than by the keypad, and that guidance is inconsistent from unit to unit. The result is a panel where some units feel crisp and others feel mushy, with identical parts. Snap-fit housing kits solve part of this by fixing the relationship between panel and PCB, as in these snap-fit housings for rubber button panels.
How Should Manufacturers Check Button Height Before Mass Production?
Measure Button Projection on the Assembled Panel
Measure from the finished front surface to the top of each key, with the unit fully assembled and screwed to torque. Measuring the bare keypad tells you what the mould did; measuring the assembly tells you what the installer will feel.
Test Pressing and Reset Performance After Installation
Press every key, at the centre and at the edge, and confirm that none of them is already closed before pressing. A simple continuity check across the switch, done before power-up, catches preload in seconds.
Confirm Dimensional Consistency Across Production Samples
Check at least three units from different mould cavities and different assembly operators. If the spread between units is larger than the spread within a unit, the problem is assembly, not moulding.
| Symptom after assembly | Most likely cause | First measurement |
|---|---|---|
| Key sits below the panel | Panel thicker than assumed, or base compressed | Projection from the finished front surface |
| Key rubs on one side | Opening alignment or key plan dimension | Side clearance at full stroke |
| Key clicks without being touched | Preload through base, gasket or torque | Switch continuity before pressing |
| Key works only in the centre | Insufficient travel at the key edge | Actuation point at centre and edge |
| Shadow line uneven across the block | Key-to-key height spread | All keys on three assembled units |
Which Assembly Step Fixes Which Dimension?
Every step of assembly closes one gap and opens another. The table lists the order in which dimensions become fixed, which is also the order in which a fit problem should be traced backwards.
| Assembly step | What becomes fixed | Dimension to check | Failure if it is wrong |
|---|---|---|---|
| Housing locating shelf | Keypad base height | Seating height of the base | The whole keypad sits low or high |
| Keypad seating | Plan position of every key | Key-to-opening clearance | One side rubs and return slows |
| Gasket compression | Distance from key top to PCB | Pre-load before the first press | Switch closed before the user touches it |
| PCB mounting | Switch height under each key | Travel available at actuation | Key works only when pressed in the centre |
| Final screw torque | Load distribution across the base | Projection after torque is applied | Panel looks uneven at one corner |
| Sealing test | Whether the front is closed | IP integrity after assembly | Water path through a key opening |
Read from the bottom up. A sealing failure that appears at the last row is often created four steps earlier, when the key was already resting on its switch.
Questions we are asked most often
Why does the same keypad work in one housing and not another?
The two housings present different panel thickness, locating height or screw load. The keypad is compliant, so it adopts the shape of whatever it is clamped into.
Can tightening the screws less solve a preload problem?
It can mask it, but it also reduces sealing. Preload should be removed by design, not by assembly torque.
Is a taller key better for outdoor panels?
Not automatically. A taller key catches on clothing and cleaning equipment and loads the web. Outdoor panels benefit more from a defined projection range and a sealed opening.
How do we specify height for two front panel variants?
Specify projection from the finished surface and give the panel thickness range. One keypad can then serve both if the range is inside the web's tolerance.
Does the keypad material affect preload?
Yes. A softer compound compresses more under the same clamp load, which reduces projection and can bring a key closer to its switch.
Reference standards, cited as documents rather than links: IEC 60529, Degrees of protection provided by enclosures (IP Code). IEC 62262, Degrees of protection provided by enclosures for electrical equipment against external mechanical impacts (IK code).
Related reading on this site: custom silicone keypads and moulded rubber products, and outdoor silicone keypads.
The keypad cannot fix a stack that was designed around nominal dimensions. What it can do is absorb the stack, if the projection requirement is written from the outside in and the sample is measured in the assembled state.
FromRubber supplies keypads alongside custom plastic enclosures, which means the panel opening and the silicone part can be reviewed against the same drawing rather than guessed at across two suppliers. Prototype tools run in three to five days, production tools in ten to twelve. Assembly sections can be reviewed at +86 186 7621 0913 (WhatsApp and WeChat).
FromRubber is the brand of Dongguan Bohao Electronic Technology Co., Ltd. (Qiaotou, Dongguan, Guangdong), certified to IATF 16949:2016, ISO 9001:2015 and ISO 14001:2015, and moulding custom silicone keypads since 2010.