Custom Raised Silicone Buttons for Portable Particle Counters: How to Design for Limited Panel Space?
A portable particle counter carries its own constraint: the optical cell and the sampling path take most of the front face, and the keypad gets what is left. That leftover area is usually a strip narrower than a thumb's travel, and it still has to hold start, stop, mode, sample time and a set of menu keys.
Raised silicone buttons are the usual answer, because a protruding key can be found without looking and gives a gloved finger a boundary to work against. The mistake is treating height as free. On a small panel, every tenth of a millimeter of protrusion changes how the key feels, how the web flexes and how the instrument survives being carried.
This article looks at raised button design as a budget: how much height is available, what it costs in supporting geometry, and how to fit several raised keys into a panel that was not designed around them.
In short: on a narrow panel, height is a budget, not a free parameter. A key is findable when the step at its boundary is clear through the glove, and stable when the supporting base grows with the crown. Past that point, extra height costs panel space and demolding difficulty without adding recognition.
Why Are Raised Silicone Buttons Useful on Portable Particle Counters?
In a cleanroom or on a site walk, the instrument is often operated with a gloved hand and without stopping to look at the panel. A flat membrane gives a gloved finger almost no information: the surface is continuous and the only landmarks are printed legends that a glove cannot read.
A raised key changes that. The finger finds an edge, confirms the boundary and presses. On a panel where keys are close together, that physical boundary is the primary identification method, and print becomes a secondary confirmation rather than the only cue.
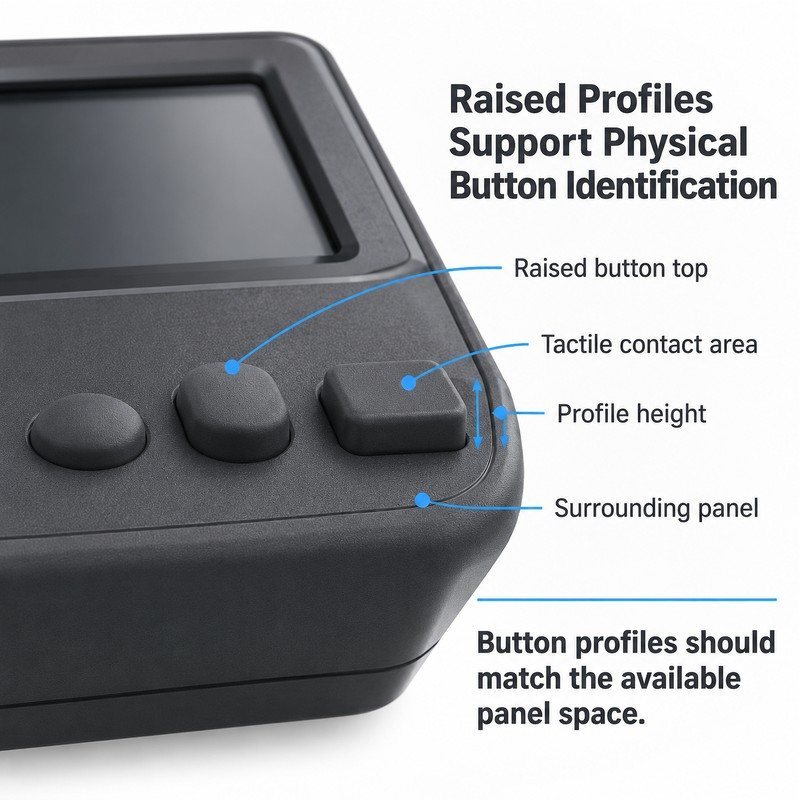
The three profiles above sit on the same panel thickness. Only the protrusion and the top shape differ, and those two variables are what the operator actually feels.
Raised Profiles Can Make Individual Buttons Easier to Locate by Touch
Locating a key by touch needs a change in surface height at the boundary, not a large absolute height. A key that rises clearly above its surroundings can be found even when it is short, provided the step is sharp enough to register through a glove. A tall key with a soft, gradual shoulder is harder to find than a shorter key with a defined edge.
Different Button Heights Can Help Separate Important Controls
Height can also carry meaning. A start key that stands slightly higher than the menu keys is found first, without reading anything. That hierarchy is more reliable than color on instruments that are used in dim light or with gloves, and it costs nothing in panel area.
Raised Buttons Must Still Fit the Instrument's Overall Panel Design
A protruding key has to survive the enclosure. If the instrument is carried in a pocket, sits face down on a bench or slides into a carry case, the tallest key takes the load. Raised buttons on a handheld device are usually paired with a bezel or a recess that protects them, and the keypad design has to account for that surrounding geometry rather than assume a flat panel.
How Should Raised Button Height Be Designed When Panel Space Is Limited?
On a compact instrument, height is not a free variable. It consumes vertical space inside the enclosure, it changes the force curve of the key, and it makes demoulding harder. The useful way to think about it is as a budget with three entries: protrusion above the panel, the supporting wall below it, and the clearance left for the finger.
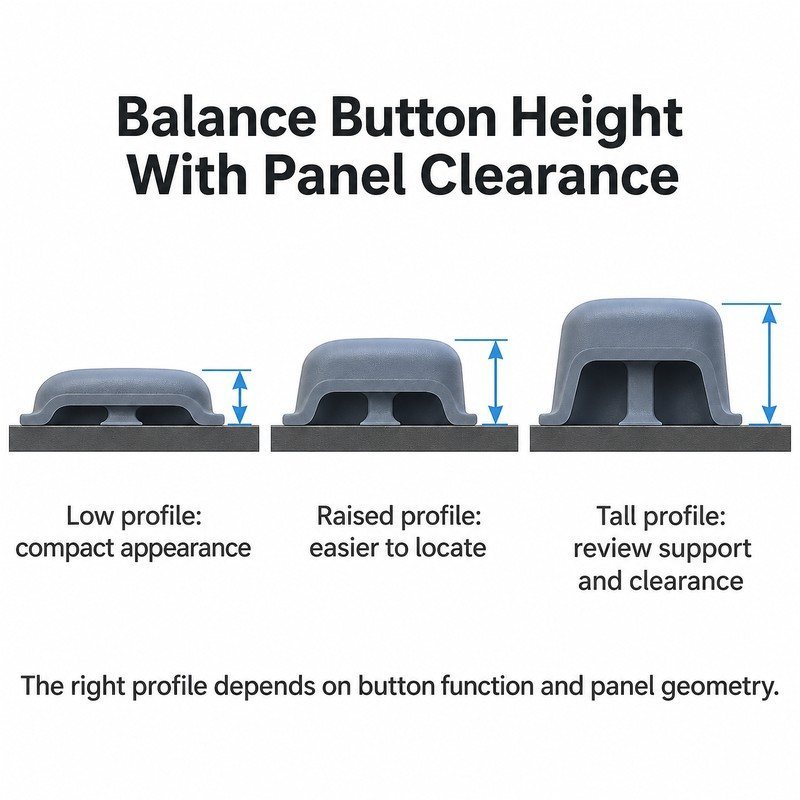
The three sections above share a panel height. The taller the crown, the more the base and the web have to do to keep the key moving straight down instead of rocking.
Excessive Button Height Can Create Unnecessary Structural and Assembly Challenges
A tall key on a small base is a lever. Side load from a thumb approaching at an angle is multiplied by the height, and the key tilts into the panel opening. The result is friction, uneven travel and a press that feels different depending on where the thumb lands. Taller keys therefore need proportionally more base and more support, which is exactly what a crowded panel does not have.
Height also affects assembly. A keypad with tall crowns has to be aligned more carefully when the housing closes, and it is more likely to be damaged during service if the panel is opened and the keypad is reused.
Very Low Profiles May Not Provide Enough Physical Differentiation
At the other end, a key that rises only slightly above its neighbours gives a glove almost nothing. The edge becomes a suggestion rather than a boundary, and the operator falls back on position memory. On a panel with several similar functions, that is where mis-presses come from.
Button Height Should Match the Intended Finger Contact Area
Protrusion and top area work as a pair. A narrow key needs more height to be findable; a wide key can be shorter because the boundary is already large. Designing one without the other produces either a key that is hard to find or a key that is unnecessarily tall for its footprint.
| Protrusion level | Tactile benefit | What it costs |
|---|---|---|
| Low profile | Compact front face, protected by the bezel | Weak boundary through a glove; hard to find without looking |
| Intermediate | Findable edge with a moderate crown | Supporting base has to grow with the height |
| Tall crown | Easiest to locate by touch | More side load, harder demolding, needs bezel or case protection |
How Can Multiple Raised Buttons Fit Into a Small Control Panel?
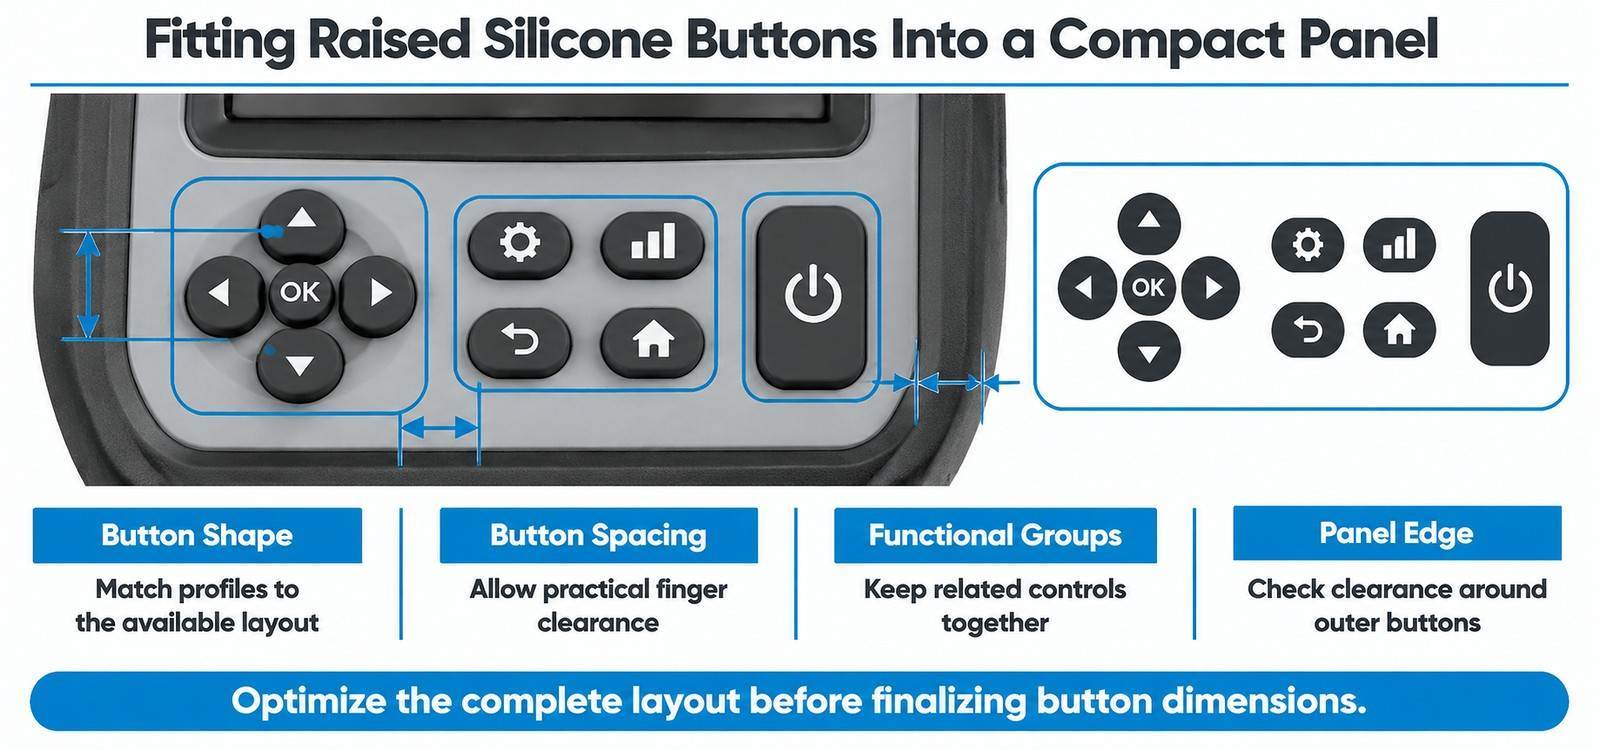
Fitting several raised keys into a narrow strip is a layout problem before it is a mold problem. The order that works: choose shapes that tile the strip efficiently, set the gaps from the glove, group by function, then confirm that the outer keys still clear the bezel.
Use Button Shapes That Match the Available Layout
A row of round keys wastes the corners of the strip. Rectangular or oval keys use the same area more efficiently and give a larger contact face for the same center distance. On a narrow panel, switching a row from round to oval often recovers several millimeters without changing the key count.
Balance Button Diameter With the Clearance Between Adjacent Controls
Every millimeter of top face is a millimeter taken from the gap. The balance point is where the gap remains visible and pressable rather than where the key looks generous. On a 30 mm strip with five keys, the difference between a 5 mm and a 6 mm gap is the difference between a usable panel and a crowded one.
Group Controls According to Their Operating Functions
Grouping does more for a crowded panel than shrinking keys. Three groups, each internally consistent and physically separated, read faster than eleven individual keys with individual shapes. The separation can be a slightly wider gap, a small step in the panel or a change in top shape between groups.
Keep Important Buttons Accessible Without Making the Keypad Oversized
The start and stop keys carry the most risk if they are mis-hit, so they deserve the best position and the clearest separation. Menu keys can be smaller and closer, because an error there is recoverable. Allocating space by consequence rather than by symmetry is what keeps a small panel workable.
Which Structural Details Help Raised Silicone Buttons Maintain Their Shape?
A raised button keeps its shape because the geometry below it supports the crown. When that support is missing, the key deforms permanently under repeated use or takes a set during storage.
Design the Supporting Base According to Button Height and Diameter
The base wall transfers the press into the web. A taller crown needs a base that is wide enough to resist tilting and thick enough not to buckle. As a working relationship, the base should grow with the height and with the top face; keeping the base fixed while raising the crown is the most common cause of a wobbly key.
Avoid Unnecessary Thin Sections Around the Button Base
A thin ring around the base is sometimes used to soften the press feel. It also becomes the point where the part fatigues first, especially if it sits next to a deep recess. If a soft feel is the goal, changing the compound is usually more predictable than thinning the wall.
Use Suitable Transitions Between the Button Top and Supporting Structure
The transition from crown to sidewall is where the key bends. A sharp internal corner concentrates strain and shows up as a split after repeated pressing; a generous radius spreads it. On a raised key, that radius is also what determines whether the crown stays flat or dishes after molding.
What Manufacturing Challenges Should Be Considered for Custom Raised Buttons?
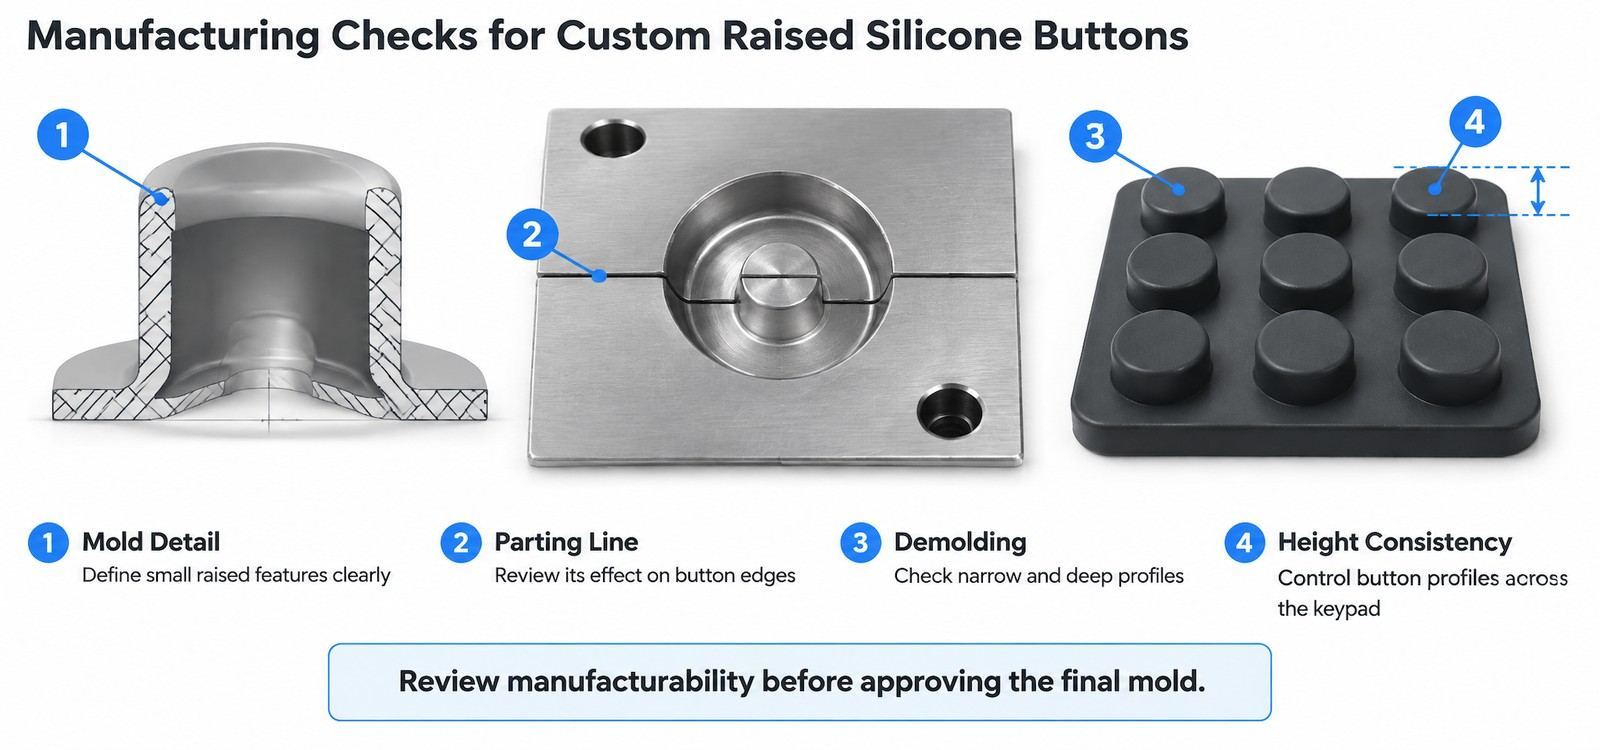
Raised features are harder to mold than flat ones. The cavity has to form a tall pocket, the air has to escape from the top of that pocket, and the part has to release without dragging the crown out of shape.
Small Raised Features Require Careful Mold Detail Design
The top of a raised key is a small cavity with a defined edge. If the edge is too sharp, it will not fill; if the cavity is not vented, the crown will round off. Both effects reduce the very protrusion the design was relying on, and both are visible only after the first shots.
Parting Line Placement Can Affect the Appearance of Raised Button Edges
A parting line on the crown edge leaves a step exactly where the finger feels the boundary. On a raised key that step is more noticeable than on a flat one. Moving it to the sidewall below the crown usually removes the tactile artefact without changing the profile.
Deep or Narrow Profiles May Increase Demolding Difficulty
A tall, narrow crown resists release and can be stretched during demoulding. The result is a key that is slightly taller or slightly oval on one side, which is hard to see but easy to feel when compared with its neighbours. Draft angles and a smoother transition help; a shorter crown helps more.
Button Height and Position Should Remain Consistent Across the Keypad
Consistency is a manufacturing control, not a design intention. A keypad where one key sits 0.15 mm higher than the rest will be noticed, because the operator learns the panel as a set. Height should be a measured characteristic on the inspection plan, not only a drawing dimension.
How Can Engineers Validate a Raised Silicone Keypad Before Production?
Validation for a raised keypad is mostly about the assembled instrument. Sample parts on a bench answer some questions, but the ones that matter involve a panel, a bezel and a gloved hand.
Review the Raised Button Profile in the Complete Panel Drawing
Check the crown height against the bezel height, the clearance around each key and the gap to the nearest panel feature. A raised key that sits inside a recess can end up effectively flush, which defeats the purpose of raising it.
Evaluate the Physical Sample for Finger Access and Tactile Response
Press the sample with the glove the instrument will meet. Check whether the boundary can be found without looking, whether the crown feels flat under the thumb and whether the return is clean. Ten presses per key exposes most problems.
Confirm Assembly Compatibility With the Actual Panel
Fit the sample into the real panel, close the housing and re-check the keys. Screw torque, gasket compression and bezel flex all change the effective protrusion, and a key that was fine before assembly can end up pre-loaded after it.
Approve the Final Geometry Before Mass Production
Approval should cover both function and manufacturability: the height set, the top shapes, the radii and the parting line. Approving only the appearance leaves the mold maker to make structural decisions that belong to the design team.
A raised keypad that is approved key by key is not approved. The panel is the unit the operator uses, and the panel is where height consistency, grouping and bezel clearance either hold together or do not.
What Should Buyers Include in a Custom Raised Silicone Button Inquiry?
- Particle counter model or application, and whether it is used in a cleanroom, in the field or both.
- Available panel dimensions, including the space taken by the display and the sampling inlet.
- Number and arrangement of buttons, with the most critical keys identified.
- Required raised profiles per key: dome, rounded, rectangular or custom.
- Button height and diameter, or the protrusion the design needs to achieve.
- Spacing and clearance to the panel edge and bezel.
- Silicone hardness preferences, or the pressing feel required with gloves.
- Color, surface texture and legend requirements.
- Panel drawings, CAD files and any bezel or recess detail.
- Prototype and production quantities.
Frequently Asked Questions
What height counts as a raised button?
There is no fixed threshold. A key counts as raised when the step at its boundary is clear enough to find through the glove used on that instrument. On a compact panel, that can be a small protrusion with a defined edge rather than a tall crown.
Can raised buttons be added to an existing keypad mold?
Only by modifying the cavity, which usually means a new insert or a new mold. Raising a crown changes the cavity depth, the venting and the demoulding behavior, so it is a tooling change rather than a surface change.
Do raised buttons increase the risk of accidental activation?
They can, if the keys protrude beyond the protection of the bezel or the carry case. A shallow recess around the keypad, or a bezel that stands level with the crowns, usually removes that risk without lowering the keys.
How many different raised profiles should one keypad use?
Two or three. Each profile needs its own cavity detail and its own inspection criteria, and the operator only needs enough variation to separate the functional groups.
Why do raised keys sometimes feel different from each other?
Height and wall variation across the cavity, uneven venting or demoulding distortion. All three are controlled by tooling and inspection rather than by the drawing, which is why height belongs on the inspection plan.
Does a raised key need a different silicone hardness?
Not necessarily, but the pair has to be checked. A tall crown in a soft compound can feel vague, while the same crown in a firm compound can feel abrupt. The right combination is found on a sample, not on a data sheet.
Conclusion: Compact Panel Design Requires More Than Simply Making Buttons Smaller
Fitting a keypad into a small panel is not a matter of shrinking everything until it fits. Raised keys earn their space by being findable, but only if the height is matched by support, the shapes tile the strip efficiently, and the mold can produce consistent crowns.
FromRubber develops compact keypads for portable instruments, covering raised button profiles, silicone material selection, mold development and sample evaluation. On a panel this tight, the useful conversation happens on a drawing and a sample, before the cavity is cut.
Sources and Further Reading
- Waterproof silicone keypad for a handheld pH meter with clear tactile feedback compact handheld keypad design with tactile requirements.
- Silicone buttons for drone gimbal controllers: tactile feedback in compact designs small-panel button design considerations.
- Digital inclinometer silicone keypad integration in compact enclosures panel and enclosure integration constraints.
- Custom control panel keypad range reference layouts for control panels.
- IEC 60529:1989+AMD1:1999+AMD2:2013 defines the IP code for enclosure protection; where a raised keypad sits inside a recess, the sealing path and the protrusion have to be reviewed together.
Designing a keypad into a narrow panel?
Send the panel drawing with the display and inlet positions marked. FromRubber will review raised profiles, height consistency and mold feasibility against the space you actually have.
Discuss a compact keypad layout
FromRubber is the export brand of Dongguan Bohao Electronic Technology Co., Ltd., Qiaotou, Dongguan, China. IATF 16949:2016 and ISO 9001:2015 certified.