Silicone Keypads for Handheld Thermal Imaging Cameras: What Makes Compact Button Design Challenging?
A thermal camera is usually operated one-handed, at arm's length, while the other hand holds a torch or a clipboard. The operator sweeps a wall, stops on a cold spot, and presses the capture key. Then again, four metres further along, and again. By the end of a survey that key has been pressed several hundred times, and every one of those presses happened while the device was pointed at something else.
That pattern explains why compact keypads fail in a particular way. The problem is rarely that a key is missing. It is that the keys that must be pressed constantly sit in a panel that was designed as a small version of a large one. When a housing shrinks, the number of functions stays the same while the space for each one falls, and something has to give: either the target size, the spacing, or the number of controls on the surface. Choosing which one gives is the whole design problem for compact silicone keypads.
Why Is Compact Silicone Keypad Design Challenging for Handheld Thermal Cameras?
The front of a thermal camera is already committed. The lens takes the centre, the display takes most of the back, and the battery and electronics take the body. What remains is a strip along the top or the side where the thumb or index finger can reach without changing grip. That strip, not the housing volume, is the real constraint.
Limited Panel Space Restricts Button Size and Spacing
Three quantities compete on that strip: key size, key spacing and key count. Fix any two and the third is decided. Designers often try to fix all three by shrinking everything by the same factor, which fails because the clear gap shrinks faster than the key. A fixed wall and a fixed land take a larger share of a smaller pitch, so a layout that reads as open at 12 mm keys reads as fused at 8 mm.
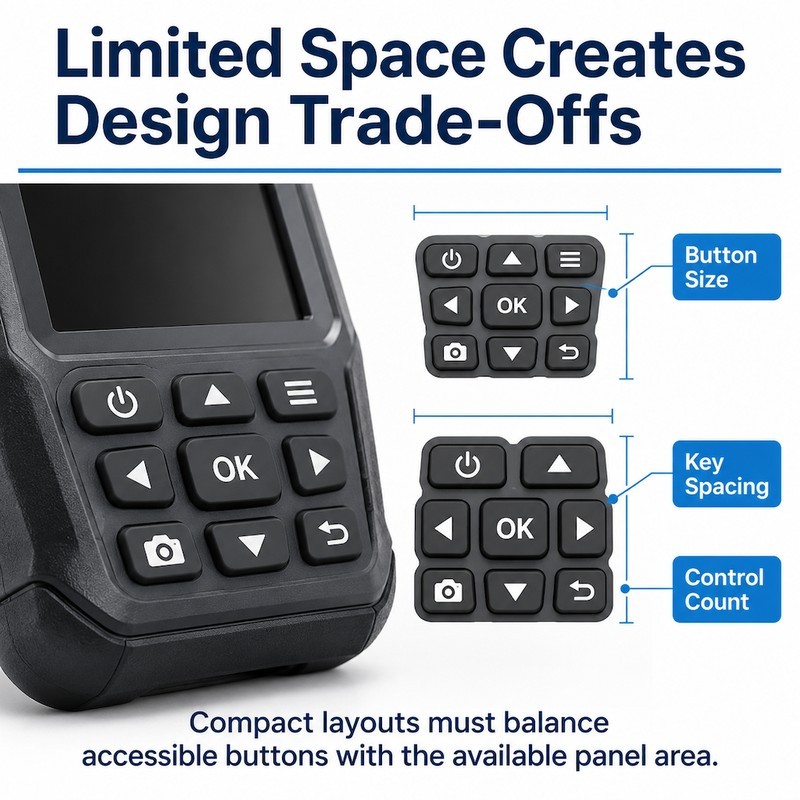
The way out is to stop treating the count as fixed. Cameras carry functions that are configured once and functions that are used constantly, and only the second group needs to be on the surface. Moving the first group into a menu, a long press or a secondary layer frees area for the keys that are actually pressed in the field.
That decision belongs to the product team, not the moulder, but it has to be made before the cavity. Once the tool exists, the layout is fixed and every later request to add a function becomes a redesign of the whole panel.
Multiple Functions Require a Clear Button Hierarchy
On a camera, the capture key is pressed more often than everything else combined. The second most used is usually navigation, because the operator moves between measurement modes and palettes. Everything else is occasional. A panel that distributes area evenly across those three tiers is optimised for nothing.
Hierarchy can be expressed in three ways: size, height and position. Size gives the thumb more to land on; height gives the finger an edge to find; position puts the key where the thumb rests without a regrip. The capture key usually deserves all three, and the configuration keys deserve none.
Handheld Operation Limits Button Accessibility
Reach changes with posture. On a bench, the thumb sweeps a wide arc across the panel. Held at arm's length and pointed slightly upward, the same thumb covers a narrower band. A key that sits comfortably at the edge of the panel on a desk can be out of reach in use, which is why the layout has to be evaluated with the device in the hand and the arm extended.
How Should Button Size and Spacing Be Balanced in a Compact Keypad?
Prioritize Frequently Used Functions
Start with a list ordered by presses per session, not by importance in the specification. The capture key will be first by a wide margin. If the panel is designed around that list, the primary key gets the best position and the largest area, and the rest fit around it.
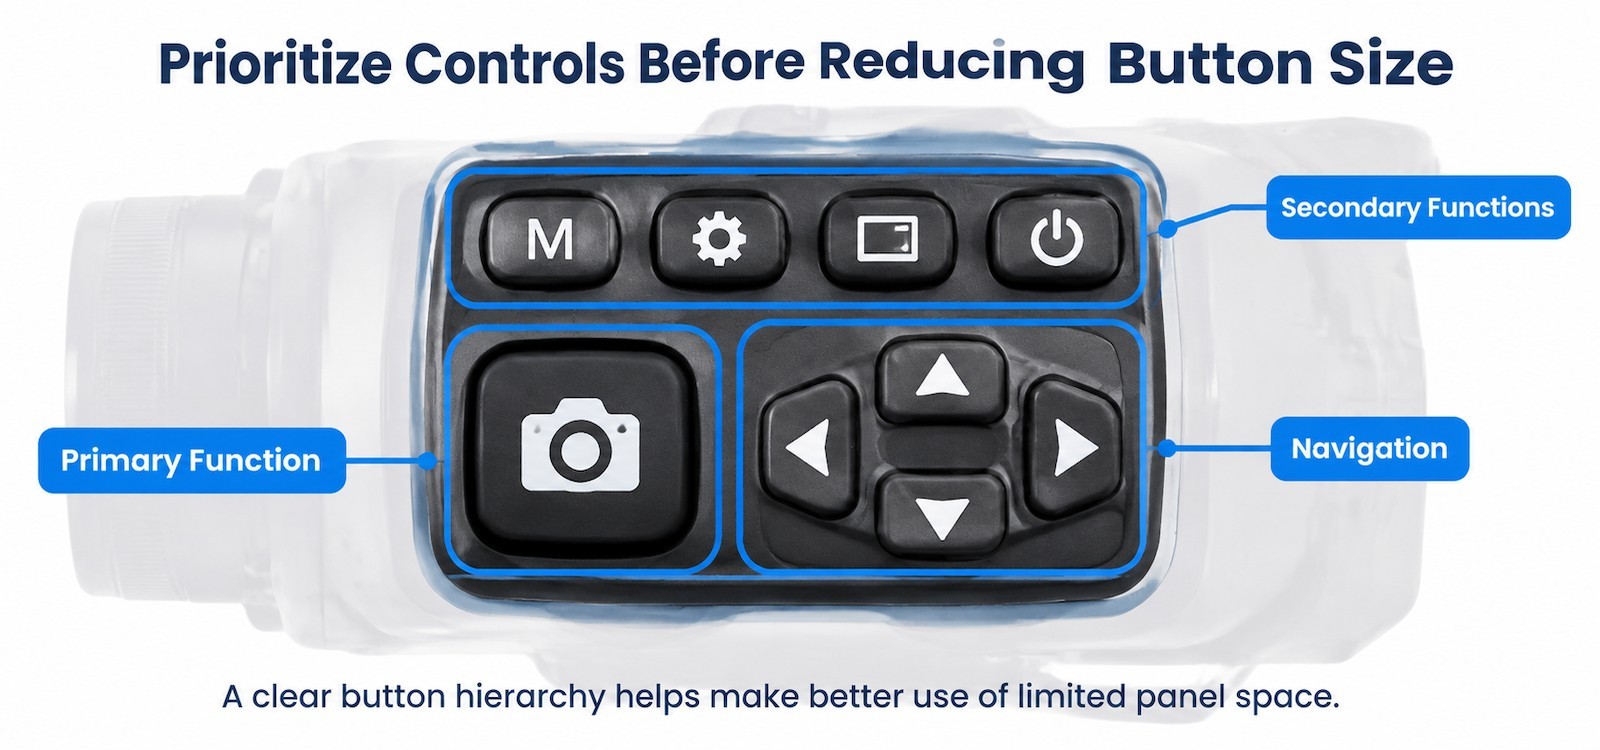
This ordering also settles arguments about symmetry. A symmetrical grid looks tidy in a rendering and behaves badly in a hand, because it gives equal weight to functions of very unequal frequency. Asymmetric layouts look less orderly and work better, provided the logic is consistent.
Choose Button Shapes That Fit the Available Space
Round keys leave the corners of their pitch unused. On a narrow strip, that wasted area is the difference between a usable target and a marginal one. Rounded rectangles and elongated keys reclaim it, and they also give the finger a direction, which helps when the operator is working by feel.
Shape changes propagate into the membrane. A long key needs support along its length or it tilts when pressed at one end, which usually means two domes under one keytop or a stiffening rib. Both change the press curve, so shape and structure have to be reviewed together.
Maintain Enough Separation Between Adjacent Buttons
On a compact panel the separation between the capture key and its neighbour is the single most valuable gap on the device. If a gloved or hurried press catches both keys, the operator captures an image and opens a menu at the same time, then has to close the menu and re-aim. A raised edge or a recessed channel between the two keys is often more effective than adding a millimetre of pitch that the housing cannot spare.
Which Silicone Keypad Structures Work Better for Compact Devices?
Low-Profile Buttons for Space-Constrained Housings
Low keys keep the panel flush and let the housing stay thin. The cost is tactile information: with less height, the finger has less edge to find and less travel to judge. On compact cameras the usual compromise is a low panel with one or two keys deliberately raised above the rest, so that the important targets remain findable while the body stays slim.
The limit is reached when the key is so flat that it cannot be distinguished from the land. At that point the panel needs a different mechanism, such as a recessed area around a raised key, rather than a further reduction in height.
Membrane Geometry for Independent Button Movement
Closely spaced keys share a membrane, and a shared membrane couples them. Press one and the sheet around it deflects, loading the neighbours. On a wide panel this is a minor effect; on a compact panel with thin webs it becomes the dominant cause of double presses.
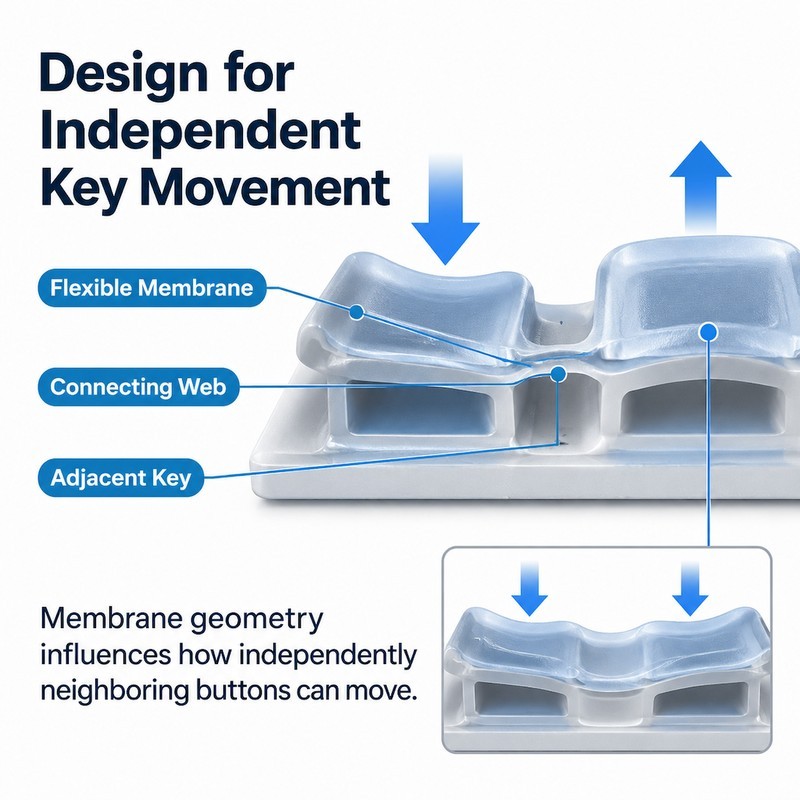
Isolation comes from the web: a narrow section with a defined hinge lets each key travel on its own, while a broad section transmits load. Narrow webs are harder to fill reliably, which is where tooling quality starts to matter more than the drawing.
A second lever is dome height. A taller dome stores more energy and returns faster, but needs vertical space under the keytop. On a thin camera body, dome height is usually the parameter that cannot be increased, which pushes the design towards a stiffer wall and a sharper snap.
Integrating Conductive Contacts Into a Compact Keypad
A carbon pill has to land on its pad with enough over-travel to tolerate assembly variation. On a compact keypad, travel is short and tolerances are tight, so the margin between "makes reliably" and "makes sometimes" is thin. Pill diameter, pad diameter and flatness all matter more here than on a large panel.
The contact also has to survive the press pattern of a camera: hundreds of short presses, often slightly off-centre, on the same key. A pill that is centred on a generous pad tolerates that; a pill that sits at the edge of a small pad will start to fail intermittently long before the membrane wears out.
| Structure | Best use on a compact camera | Trade-off |
|---|---|---|
| Low-profile key, flush panel | Functions that are configured once | Little tactile information for sight-free use |
| Raised key with a defined wall | Capture key and other frequent controls | Needs vertical space and a bezel for protection |
| Narrow hinged web | Closely spaced keys that must move independently | Harder to fill; needs precise tooling |
| Broad web | Keys treated as one group, such as a keypad pad | Adjacent keys deflect together |
How Do Silicone Material Properties Affect Compact Keypad Performance?
Select Hardness Based on Button Dimensions and Structure
Small keys have less material to deform, so the same compound produces a firmer press than it would on a large key. Choosing hardness without accounting for key size is how compact panels end up with keys that feel heavy despite a soft specification.
Hardness is measured on the Shore A scale defined in ASTM D2240, on a flat test piece, which is a useful common reference and a poor predictor of a 6 mm key. The relationship between the two has to be established on the actual geometry, in samples.
Balance Flexibility With Dimensional Stability
Compact keypads use thin sections, and thin sections are sensitive to everything: fill, cure, demoulding and storage. A structure flexible enough to give a light press can also deform enough to sit unevenly in its housing, which shows up as a key that works on the bench and not in the assembly.
The balance is usually struck by keeping the load-bearing areas thicker and putting the flexibility into defined hinges, rather than by reducing thickness uniformly across the part.
Consider Surface Finish and Button Identification
There is very little room for legends on a compact key. Symbols have to be small, and small printed symbols are the first thing to wear. Moulded symbols, formed as a shallow recess or a raised relief in the silicone, survive longer and can be read by touch, which matters on a device operated without looking.
Finish matters too. A glossy surface shows handling marks and becomes slippery; a matte finish hides marks and holds a fingertip better. Where a key needs to be found by touch, a moulded edge is more reliable than a roughened surface.
What Mold Design Challenges Arise When Manufacturing Compact Silicone Keypads?
Maintaining Small Button Dimensions and Fine Structural Details
Small cavities are less forgiving. A tenth of a millimetre in cavity depth is a small fraction of a 2 mm key and a large fraction of its travel. Electrode wear, polishing and rework all move the dimension, so the tool has to be built with enough material to be corrected more than once.
Controlling Flash and Parting Lines Around Small Buttons
Flash on a compact panel is not cosmetic. Between two keys with a narrow gap, a hairline of excess material closes the gap and stiffens the web. Parting line placement decides whether that flash can be trimmed cleanly or whether trimming damages the key edge.
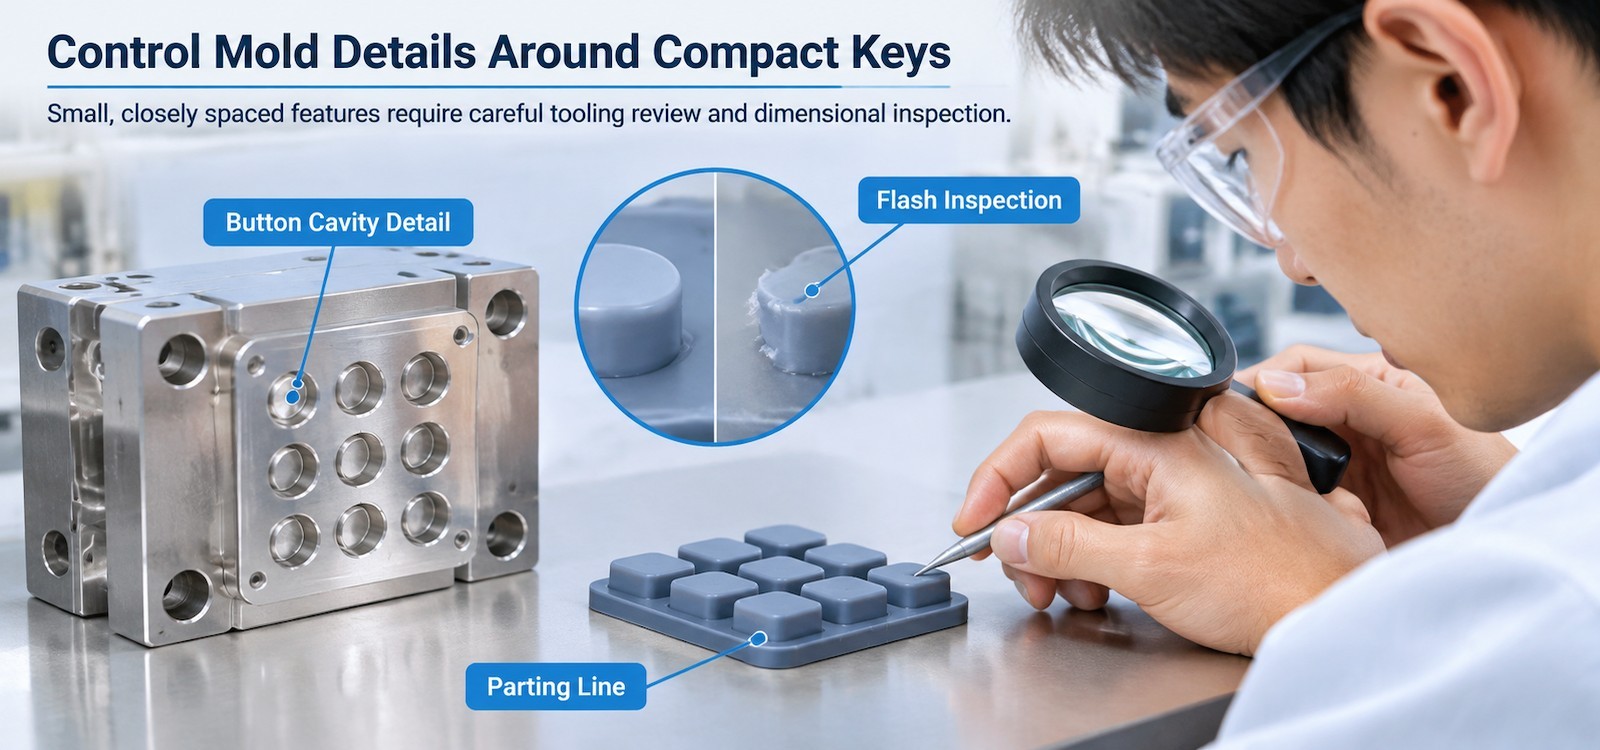
Venting belongs in the same conversation. A compact cavity with thin sections traps air, and trapped air produces short shots and burn marks that look like material faults. Vent placement should follow the last point to fill, which is predictable from the layout.
Ensuring Consistent Button Performance Across Multiple Cavities
Multi-cavity tools produce keys from several cavities in one shot. If the cavities differ in depth or venting, the panel will carry a subtle inconsistency that is hard to trace, because every part contains keys from every cavity. First-article inspection on a compact keypad should therefore identify which cavity produced which key, at least once.
How Can Thermal Camera Manufacturers Validate a Custom Silicone Keypad?
Check Button Accessibility in the Complete Housing
Fit the keypad into the real housing, hold the device as it is held in the field, and press the capture key twenty times without looking. Record misses. That single test catches most reach problems before tooling approval.
Evaluate Pressing Force and Tactile Consistency
Measure the four points of the press curve on every key and compare them across the panel. On a compact panel, differences between neighbouring keys are felt more strongly than on a large one because the finger has less room to compensate.
Verify PCB Alignment and Electrical Activation
Check contact resistance across repeated presses, with the assembly closed and the screws at torque. A keypad that passes on an open bench can fail once the housing compresses the membrane, and that is the failure mode we see most often on compact devices. Our note on keypads that pass testing and fail after assembly describes the usual causes.
Frequently Asked Questions About Compact Silicone Keypads
How can manufacturers fit more buttons into a compact silicone keypad?
Usually by reducing the number of controls on the main surface rather than by shrinking the keys. Moving configuration functions into a menu or a secondary layer frees area for the keys pressed in the field, which is the only area that has to stay generous.
Are low-profile silicone buttons suitable for handheld thermal imaging cameras?
They are suitable when one or two keys are deliberately raised above the rest. A fully flush panel keeps the body thin but removes the tactile information the operator needs when pointing the camera away from himself.
How does membrane thickness affect compact keypad performance?
Thickness sets the spring rate of the sheet. On compact parts it also sets how well the section fills and how stable the key is in the housing, so very thin membranes can solve a press problem and create an assembly problem.
Can different button shapes be combined in one custom silicone keypad?
Yes, and on compact panels they usually should be. Mixed shapes improve area use and give the finger direction, provided each shape is supported by the right dome structure underneath so the press stays predictable.
What should be checked before approving a compact silicone keypad mold?
Cavity depth and venting on the small keys, parting line position relative to the narrow gaps, and the ability to correct the tool after sampling. Our notes on keypads for laboratory analyzers describe a similar compact-panel review in another instrument family.
Where Compact Design Is Won
Compact silicone keypads are not small versions of large ones, and compactness is not a matter of shrinking a panel until it fits. It is a decision about which functions deserve to be on the surface, followed by shape and structure work that gives those functions enough target area to be pressed without looking. The keys that are pressed once a week can be small; the key that is pressed three hundred times in a survey cannot.
FromRubber is operated by Dongguan Bohao Electronic Technology Co., Ltd. in Dongguan, Guangdong. FromRubber builds custom silicone keypads with in-house tooling in Dongguan, including small-cavity work and multi-cavity layouts under IATF 16949:2016, ISO 9001:2015 and ISO 14001:2015. If you are working on a compact panel and the housing will not grow, send the layout with the function list and the housing section. Phone, WhatsApp or WeChat: +86 18676210913, or upload through the contact page.
Related Reading
Sources and Test Methods Referenced
- ASTM D2240-15(2021), Standard Test Method for Rubber Property, Durometer Hardness. ASTM International.
- ISO 37:2017, Rubber, vulcanized or thermoplastic, determination of tensile stress-strain properties. ISO.
- ISO 2768-1:1989, General tolerances, Part 1: Tolerances for linear and angular dimensions without individual tolerance indications. ISO.
- ISO 23529:2016, Rubber, general procedures for preparing and conditioning test pieces for physical test methods. ISO.
- ASTM D395-18(2025), Standard Test Methods for Rubber Property, Compression Set. ASTM International.
- Editions checked against the ASTM, ISO and IEC publisher listings in November 2026.