
What Structural Details Should Be Checked Before Molding a Silicone Beauty Blender Holder?
Most silicone beauty blender holders are approved on a dry sponge. The sample looks right, the sponge fits, the lid closes, and the tool goes to tooling. Three weeks later the first production batch is packed with damp sponges, and the holder that passed every drawing check starts to grow a smell, because the cavity holds moisture against a sponge that never dries.
A blender holder is not a display stand with a hole in it. It is a wet storage device that has to hold a compressible, water-retaining object, let air move around it, let water leave, and stand up on a wet counter. Each of those requirements has a structural expression, and each is cheaper to fix before the mold exists.
Why Structural Design Matters Before Molding a Silicone Beauty Blender Holder
An attractive external shape tells a buyer very little about whether a holder works. The inside of the part does four jobs at once: it positions the sponge, keeps contact pressure low enough that the sponge is not crushed, allows air to circulate, and provides a path for water to leave. These jobs conflict. More support means more contact, and more contact means less airflow. A deeper cavity hides the sponge better and traps more moisture.
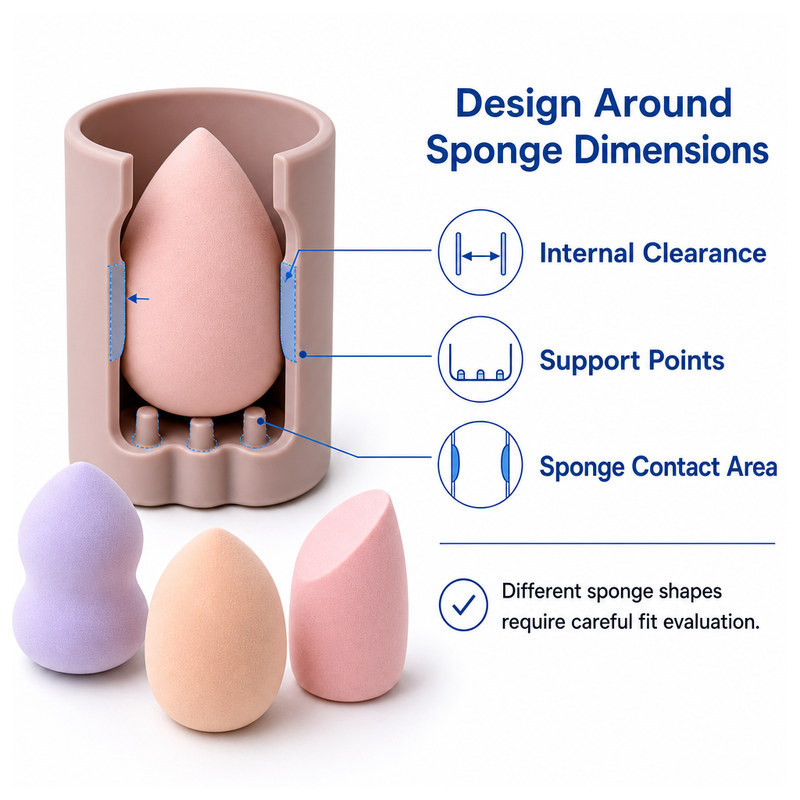
Support is a contact decision. Three pads hold a sponge in place while leaving air paths between them; a continuous ring holds it more firmly and closes those paths.
Those conflicts are resolved by geometry, and geometry is what a mold cuts permanently. A change to the opening width or the cavity depth after tooling is not a drawing revision; it is a new electrode, a new cavity insert, or a new mold. That is why the structural review deserves time before purchase order, not after first article.
Check Whether the Holder Can Support Different Beauty Sponge Shapes
Leave Enough Space for Different Sponge Sizes
Beauty sponges are not standardized. A teardrop sponge, a rounded sponge, and an angled wedge differ in width, height, and where their widest point sits. A holder designed around one sponge will fit that sponge and squeeze the next one, so the first design question is which range of sponges the holder has to accept, not which single sponge the brand currently sells.
The cavity should be sized around the widest sponge in that range, measured at the height where it will sit, not at its widest point overall. A sponge that is 55 mm wide at its base and 40 mm wide at the support height needs a cavity sized for the 40 mm section. This is a small measurement detail that prevents a large fit problem.
Design Support Points That Hold the Sponge Without Squeezing It
Support can be a ring, three or four pads, or a shaped cradle. Each produces a different contact pattern:
| Support type | Effect on the sponge | Effect on airflow |
|---|---|---|
| Continuous ring | Stable, but compresses the sponge around its full perimeter | Blocks air at the contact line |
| Three or four pads | Holds position with small contact areas | Leaves gaps between pads for air |
| Shaped cradle | Precise positional control for one sponge shape | Depends entirely on how the cradle is drafted |
| Open bottom with a raised lip | Minimal contact, sponge rests on its own base | Good, if the lip does not close the opening |
Compression matters because a squeezed sponge stays deformed and dries more slowly. It also pushes the sponge against the cavity wall, which closes the very gap that ventilation depends on. The design target is enough contact to stop the sponge from falling over, not enough to hold it tight.
Account for the Sponge Being Wet
A wet sponge swells. Depending on the material and how much water it holds, the change can be noticeable enough to turn a comfortable fit into a tight one. Designing the cavity around the dry dimension and then testing with a wet sponge is one of the most common reasons a holder that passed sampling feels wrong in use.
Hardness of the holder itself matters here as well. A softer silicone wall deforms to accept a swollen sponge, while a harder wall transfers the load to the sponge. Hardness is measured by indentation, and the method and scale matter when a specification is written, as described in ASTM D2240.
Review the Opening and Internal Cavity Structure
Make Sure the Opening Allows Easy Placement and Removal
The opening is a compromise between retention and access. A narrow opening holds the sponge securely and is awkward to use with wet hands. A wide opening is easy to use and lets the sponge lean. The useful middle ground is usually an opening slightly narrower than the sponge's widest section, with a soft lip that flexes during insertion and returns afterwards.
Two details make that work. First, the lip needs a rounded entry rather than a sharp edge, so the sponge slides in instead of catching. Second, the wall behind the lip needs enough thickness to spring back; a lip that is too thin will fold and stay folded.
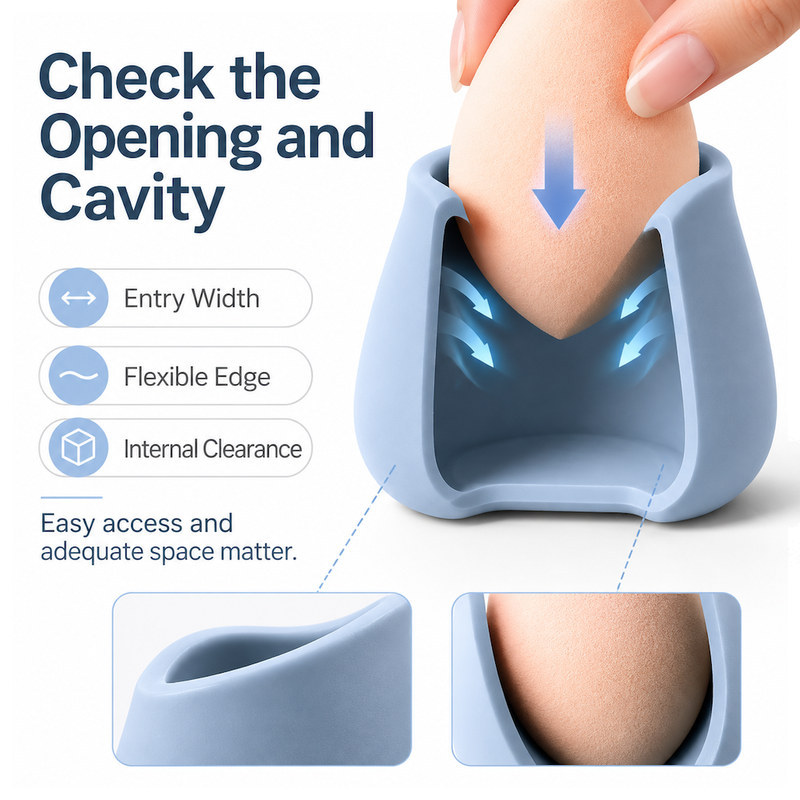
The opening does two jobs: it lets the sponge in, and it keeps the sponge upright. A rounded, flexible lip does both; a sharp edge does neither well.
Avoid Deep Cavities That Restrict Airflow
Depth is often added for appearance, to hide the sponge below the rim. Past a certain point, depth works against the product: the sponge sits in a well with no cross-flow, and the only air exchange happens at the top opening. A shallower cavity with side openings usually dries faster than a deep cavity with a single opening at the top.
If the design needs depth, add ventilation at the side rather than only at the top. The openings should sit above the normal water line but below the rim, so air can move across the sponge rather than only over it.
Plan Drainage and Ventilation Features Together
Ventilation and drainage are related but not the same requirement. Ventilation moves humid air out; drainage moves liquid water out. A holder can pass one test and fail the other, which is why both should be checked on the same prototype.
- place drainage openings at the lowest points of the cavity in its resting position;
- keep ventilation openings above the drainage level so they do not become water outlets;
- avoid placing either type of opening in a narrow connecting section that carries load;
- confirm the openings do not sit under the sponge's contact area, where they would be blocked.
Position Drainage Openings at Functional Water Collection Areas
Water collects at the bottom of the cavity and in any recess the sponge does not fill. If the cavity floor is flat, water sits in a film across the whole floor and leaves only slowly. A slight slope towards one outlet, or a shallow channel, gives the water a direction.
Keep Ventilation Openings Away from Critical Support Areas
Openings reduce local stiffness. A row of holes through a narrow wall can turn a rigid section into a hinge, and the holder will then lean when a wet sponge is placed in it. Distribute ventilation openings over wider areas rather than concentrating them at one height, and keep at least one continuous band of material between adjacent openings.
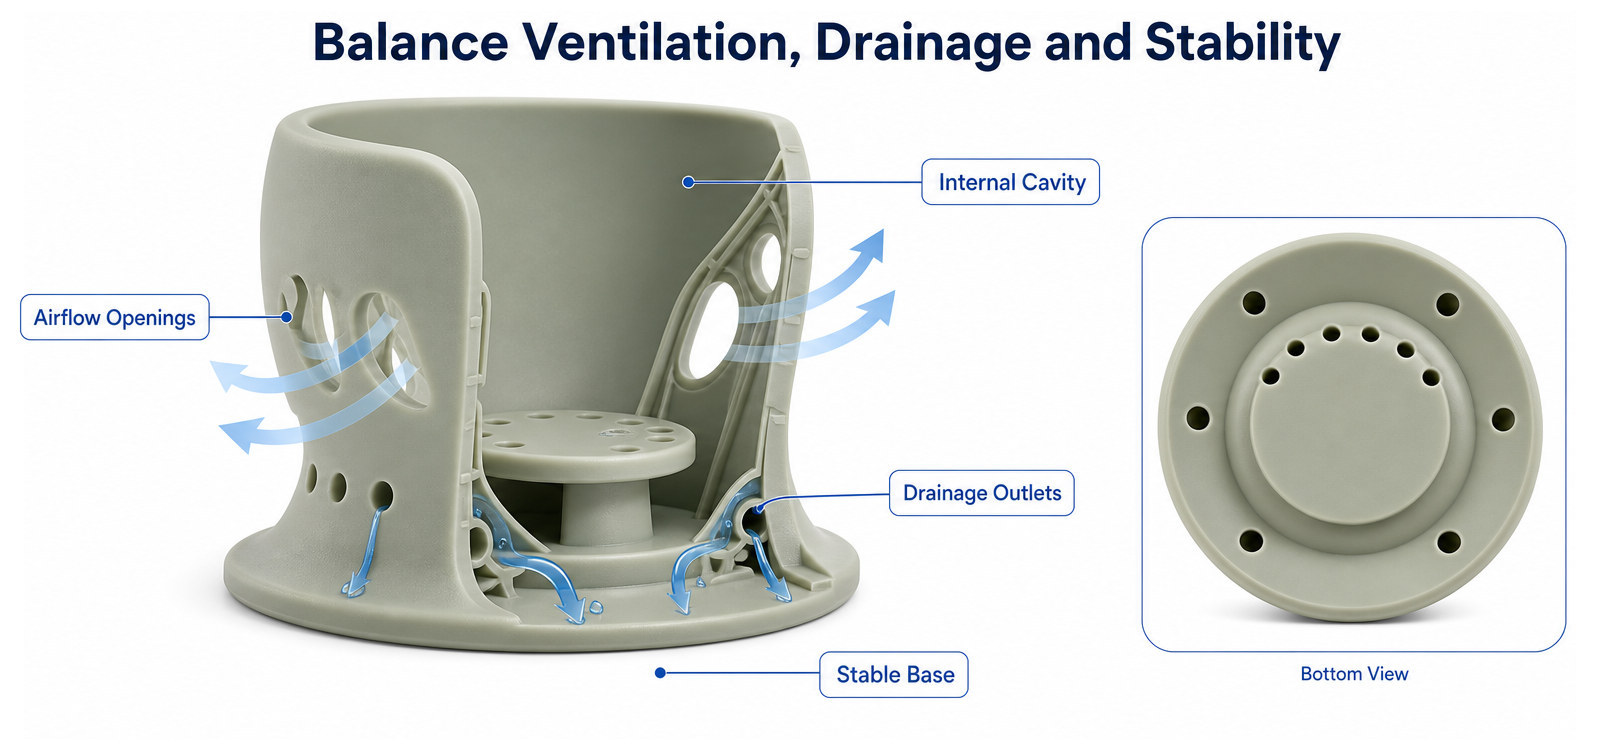
Ventilation and drainage are separate features on the same part. Side openings move humid air; bottom outlets move water. Putting both in one place usually weakens the wall between them.
Check Wall Thickness and Base Stability
Avoid Excessively Thin Walls Around Openings
Thin walls around openings are the first place a silicone holder fails, because the opening already concentrates stress and the thin band has little material to distribute it. A useful check is to compare the wall thickness at the opening with the wall thickness elsewhere on the part; a large difference is a warning, not automatically a defect.
Dimensional tolerance class also affects how thin a wall can be in production. Tolerance classes for moulded rubber products are set out in ISO 3302-1, and a wall designed at the edge of its tolerance band has no room for normal process variation.
Make Sure the Base Can Support the Holder
Stability is a moment problem, not a weight problem. A holder tips when the centre of gravity of the loaded assembly falls outside the base contact area. Adding mass to the base lowers the centre of gravity, but widening the base or lowering the overall height does more, and it does it without adding material and cure time.
Wet countertops make this worse, because a holder that is marginal on a dry surface will slide or tilt on a wet one. If the base is small, a slightly recessed underside or a shallow ring of contact can increase grip without changing the silhouette.
Avoid Unnecessary Thick Sections
A thick base is the easiest way to make a holder feel solid and the easiest way to add cycle time. If the base is thick only for perceived quality, consider a thinner base with a wider footprint instead. The part will be lighter, cure faster, and usually stand more stably.
Evaluate Moldability and Demolding Before Tooling
A holder with an internal cavity and side openings is a demolding question before it is an aesthetic one. The review should cover:
- undercuts, especially where an opening lip overhangs the cavity;
- whether the product can be released without stretching a thin section permanently;
- parting line position, and how visible the resulting line will be on the outside surface;
- areas where flash will form and how they will be trimmed;
- whether the geometry fits compression molding or needs a different process;
- how the part is ejected, and whether the ejection points will mark a visible surface.
A flexible silicone part tolerates more undercut than a rigid plastic part, which is an advantage and a trap. It tolerates the undercut once; whether it tolerates it across a production run without permanent set depends on the section, the hardness, and the demolding temperature.
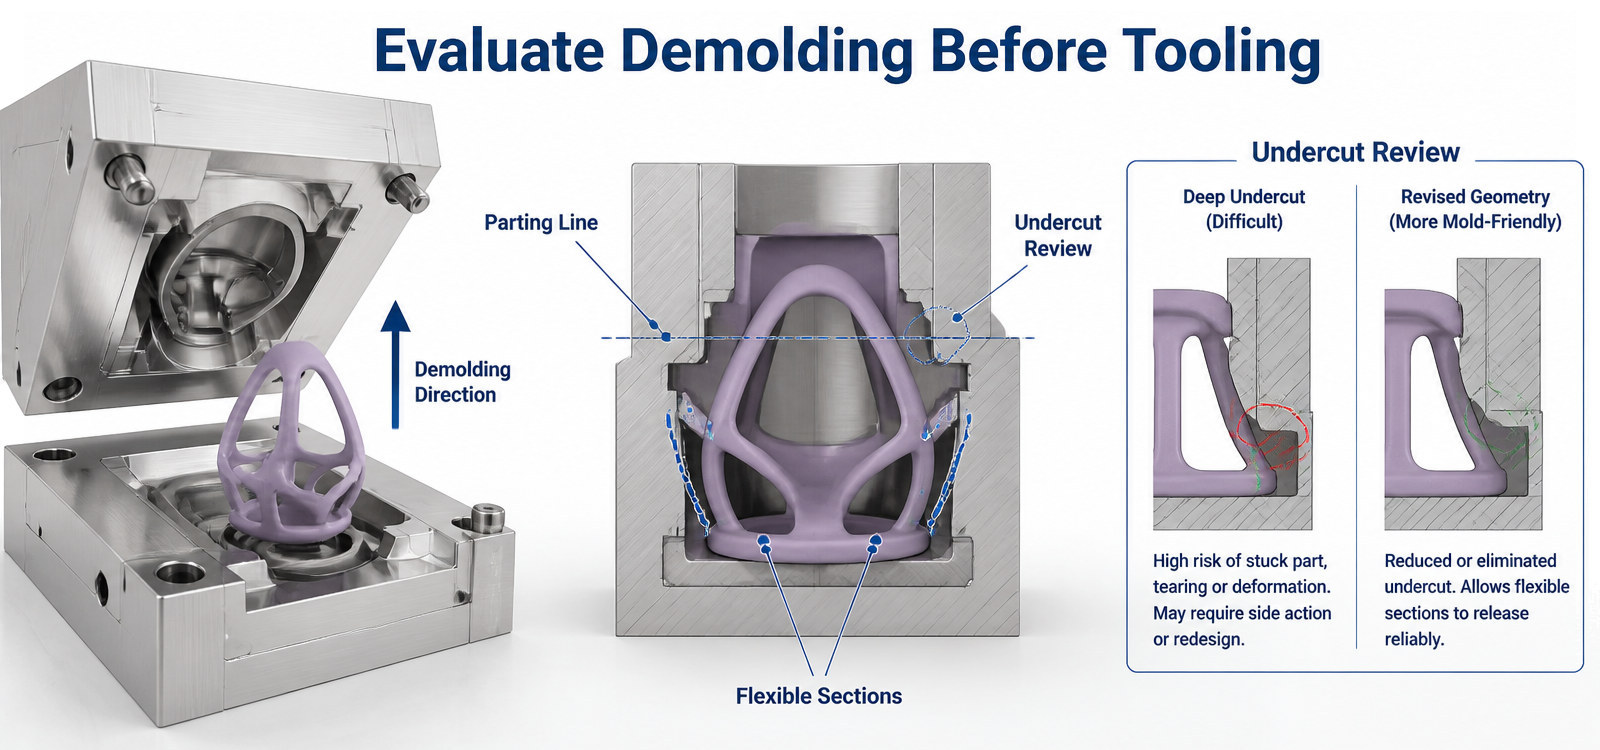
Demolding decides whether a good design can be produced. The parting line, the undercut and the direction of release are reviewed before the cavity is machined, not after the first sample sticks.
What Should Be Tested During the Prototype Stage?
- Fit several representative sponge sizes, dry and then wet.
- Insert and remove a sponge with a wet hand, and note whether it catches on the lip.
- Place the loaded holder on a flat surface and on a slightly wet surface, and push it lightly sideways.
- Add water to the cavity and observe where it leaves and where it stays.
- Leave a damp sponge in the holder and check the interior after a day.
- Flex the opening repeatedly and inspect for whitening or a tear starting at the edge.
- Measure the critical dimensions and compare them with the drawing before approving mass production.
These tests are not pass/fail checks in the certification sense. They are design checks that produce information the toolmaker can use, and they cost a day rather than a mold.
A Pre-Mold Checklist for Custom Silicone Beauty Blender Holders
| Item to confirm | Reason |
|---|---|
| Sponge size range and wet dimensions | Sets the cavity and the clearance |
| Opening width and lip flexibility | Balances access against retention |
| Support points and contact areas | Controls squeeze and airflow |
| Ventilation and drainage positions | Stops moisture being trapped against the sponge |
| Wall thickness around openings | Prevents tearing and leans |
| Base size and contact pattern | Determines tip-over resistance |
| Undercuts and demolding direction | Confirms the mold can release the part |
| Appearance and logo requirements | Sets the surface finish and the parting line position |
Develop Your Custom Silicone Beauty Blender Holder with FromRubber
Reviewing a holder's structure before tooling is usually a short conversation with a long payback. Our related notes on why silicone makeup brush holders tip over and sponge case ventilation cover the same structural questions from two other product angles.
FromRubber is a custom silicone manufacturer working with beauty brands and OEM buyers on custom silicone cosmetic holders and other molded accessories. Engineering consultation, mold machining on 10 in-house CNC machines, and production on 40 compression molding machines allow a design change to be tested without leaving the supply chain. If the holder ships with other parts in one set, our note on designing matching silicone beauty sets covers shared tooling and colour decisions. Send drawings, 3D files, or a physical sample through the inquiry form, or contact WhatsApp and WeChat at +86 18676210913.
Frequently asked questions
Should a beauty blender holder be designed for a dry or a wet sponge?
For a wet sponge. The wet dimension is the one the product will actually see in use, and a cavity sized only on the dry sponge becomes too tight once the sponge absorbs water.
Is a deeper cavity better for keeping the sponge clean?
A deeper cavity hides the sponge but reduces air exchange. Depth should be paired with side ventilation, otherwise the holder keeps moisture close to the sponge for longer.
How wide should the opening be?
Slightly narrower than the sponge's widest section, with a flexible lip. That gives retention without requiring force, and it allows the lip to deform during insertion and recover afterwards.
Why does the holder still tip over when it feels heavy at the bottom?
Because tipping depends on the base contact area and the height of the centre of gravity, not on mass alone. A wider or lower base does more for stability than extra material in the base.
Do side openings weaken the holder?
They reduce local stiffness, so they need to be placed away from narrow load-bearing sections and spaced so that material remains between them. Positioned poorly, they turn a wall into a hinge.
Sources and further reading
- ASTM D2240-15(2021), Standard Test Method for Rubber Property, Durometer Hardness. ASTM D2240 standard page (https://store.astm.org/d2240-15r21.html)
- ISO 3302-1:2014, Rubber, Tolerances for products, Part 1: Dimensional tolerances. ISO 3302-1 standard page (https://www.iso.org/standard/62492.html)
- FromRubber technical notes: brush holder stability, sponge case ventilation.