
Quick Tip: How to Position Drainage Holes on Silicone Makeup Brush Cleaning Mats
A silicone makeup brush cleaning mat looks like a simple sheet with bumps. Then the first sample comes back from tooling, the user washes three brushes, and water sits in a ring around the middle texture zone for the rest of the day. The mat has holes. It has enough holes. They are simply in the wrong places, and the surface between them has no reason to send water towards any of them.
Drainage on a silicone makeup brush cleaning mat is a layout problem before it is a hole problem. The holes only decide how fast water leaves; the surface decides whether water ever arrives.
Why Drainage Hole Placement Matters in a Silicone Makeup Brush Cleaning Mat
A cleaning mat is a shallow basin with texture on the floor. Water enters from a tap, spreads across the texture, and then has to leave. If the mat is perfectly flat, the water film has no preferred direction, so it stays where surface tension and the texture hold it. A hole under that film only drains the small area directly above it.
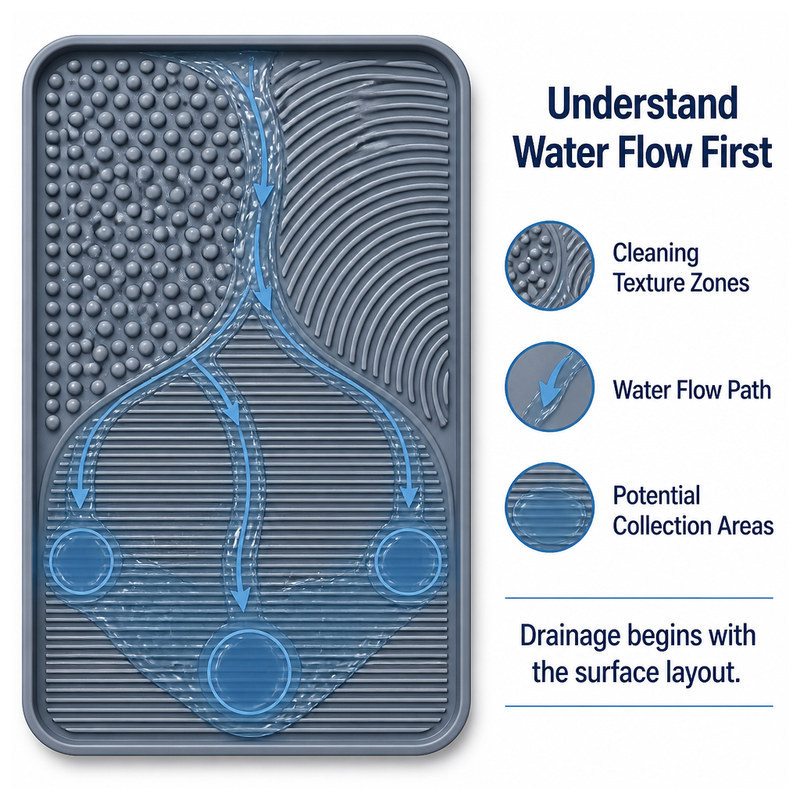
Water does not spread evenly across a textured mat. The overlay shows where it slows down and where it pools, which is the information that should decide where the outlets go.
This is why adding holes rarely fixes a drainage complaint. Holes are outlets, not drains. They work only when the surface is shaped to deliver water to them, and when the path between the cleaning zone and the outlet is not blocked by a raised texture, a rim, or a high spot in the middle.
The second reason placement matters is that a hole is a structural interruption. Every opening removes material from a part that is repeatedly flexed, squeezed, and washed. Put the opening where the mat bends most and it becomes a tear initiation point. Put it where the mat is thinnest and it becomes the first place to deform. Placement is therefore a compromise between hydraulics and strength, and the compromise has to be decided on the drawing, not at the press.
Identify Where Water Naturally Collects on the Cleaning Mat
Check the Lowest Areas of the Mat
Water collects at the lowest point of the part in its working orientation, which is not always the lowest point of the part as drawn. A mat that sits flat on a counter has its low point at the geometric centre only if the base is flat and the counter is level. A mat with a slight crown in the middle, or with feet at the corners, has a different low point, and the holes need to follow the geometry that the user actually puts on the sink.
A useful exercise is to pour a thin layer of water onto a prototype and photograph where it stops. That photograph is more informative than a drawing review, because it shows the real interaction between the surface contour, the texture, and the way the part rests.
Consider the Position of Raised Cleaning Textures
Raised bumps, ridges, and grooves are small dams. Water moving across the mat meets the first row of bumps, spreads sideways, and continues in whatever direction the gaps allow. A dense field of round bumps slows flow in every direction. A field of parallel ridges channels water along the grooves but blocks it across them.
This is why texture layout and drainage layout have to be designed together. A single cleaning zone with four texture types will have four different flow behaviours, and each one creates its own small collection area at the boundary where the textures meet. Our notes on deep grooves versus fine textures in silicone mats describe the same trade-off between texture depth and cleanability from a different product angle.
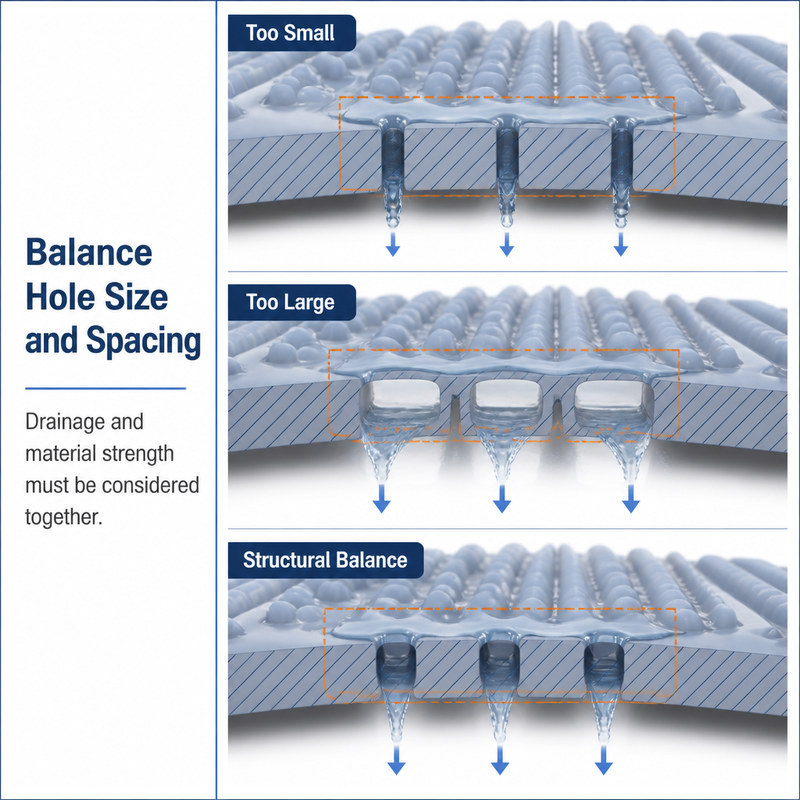
Three openings, three outcomes. Small holes pass water slowly and clog; oversized holes remove the material that carries load; balanced openings keep both a flow path and a structural band.
Position Drainage Holes Without Interfering with Brush Cleaning Areas
The cleaning surface is where the product delivers its function, so holes should not cut through the middle of the most-used texture. A brush is scrubbed in a small circular motion, and the area under that motion needs continuous material so the bristles meet the texture rather than falling into an opening.
A workable arrangement separates the mat into two kinds of zones: a cleaning zone with uninterrupted texture, and a drainage zone at the perimeter or along a channel between cleaning zones. Water moves from the cleaning zone into the channel, and the channel carries it to the outlets. This also makes the mat easier to design, because the drainage zone can be shaped for flow without compromising the texture.
Where the design does not allow a separate channel, place the openings along the boundary between two texture fields rather than in the middle of one. The boundary is already a place where water changes direction, and a small opening there interrupts less of the cleaning function.
Choose the Right Drainage Hole Size and Spacing
Why Holes That Are Too Small May Drain Slowly
A small opening drains slowly for two reasons. First, the flow through an opening is limited by its area, so a narrow hole passes less water per second. Second, a small opening is easily blocked: a bead of cleanser, a strand of bristle, or a film of residue is enough to close it, and once it closes it does not reopen by itself.
Small holes also behave differently with a water film. At low water depth, surface tension holds water against the opening rather than letting it fall through, so a narrow hole may look dry while water remains a few millimetres away on the surface.
Why Excessively Large Holes Can Weaken the Mat
A large opening leaves a narrow band of silicone between the hole and the mat edge, and that band takes the full load when the mat is lifted or flexed. Silicone is flexible but not indestructible; a thin ligament will stretch, then tear, starting at the sharpest point of the opening.
The practical consequence is a mat that drains well and fails early. The fix is to keep the material between adjacent openings and between an opening and the mat edge thick enough to carry the load, and to round the opening rather than leaving a sharp corner. Moulded rubber dimensional tolerances, including the tolerances that apply around openings, are covered by ISO 3302-1, which is a useful reference when a drawing needs to state how much variation around a hole is acceptable.
How Hole Spacing Affects Water Flow and Product Strength
Spacing is a balance between two effects. Closer spacing drains a wider area but removes more material. Wider spacing keeps strength but leaves water travelling further across a flat surface, where it may not travel at all. Spacing therefore has to be judged together with mat thickness: a thicker mat tolerates more open area, while a thin mat needs more material between openings.
There is no universal number here, and any supplier who quotes one without seeing the part is guessing. The right spacing comes from the combination of mat thickness, expected water volume, and how the part is handled.
Match Drainage Hole Placement with the Mat's Bottom Structure
The bottom of the mat is the part that decides where water actually goes, because water leaves through it. Four common bottom designs behave differently:
| Bottom design | Drainage behaviour | What to watch |
|---|---|---|
| Flat | Water spreads evenly and leaves only where an outlet exists | No low point, so outlets must be placed along the perimeter |
| Sloped | Water moves towards the low edge by gravity | The slope must be visible in the section drawing, not only in the 3D model |
| Recessed channel | Water collects in the channel and exits at its lowest end | Channel depth must be continuous; a high spot stops the whole path |
| Raised feet | Creates a gap under the mat for water to escape | Feet must not block the outlets, and the gap must be open on the downhill side |
Hole placement has to be checked in the resting orientation, with the mat on the surface it will actually be used on. A hole that is correct when the mat hangs on a hook can be wrong when it lies flat, because the low point moves.
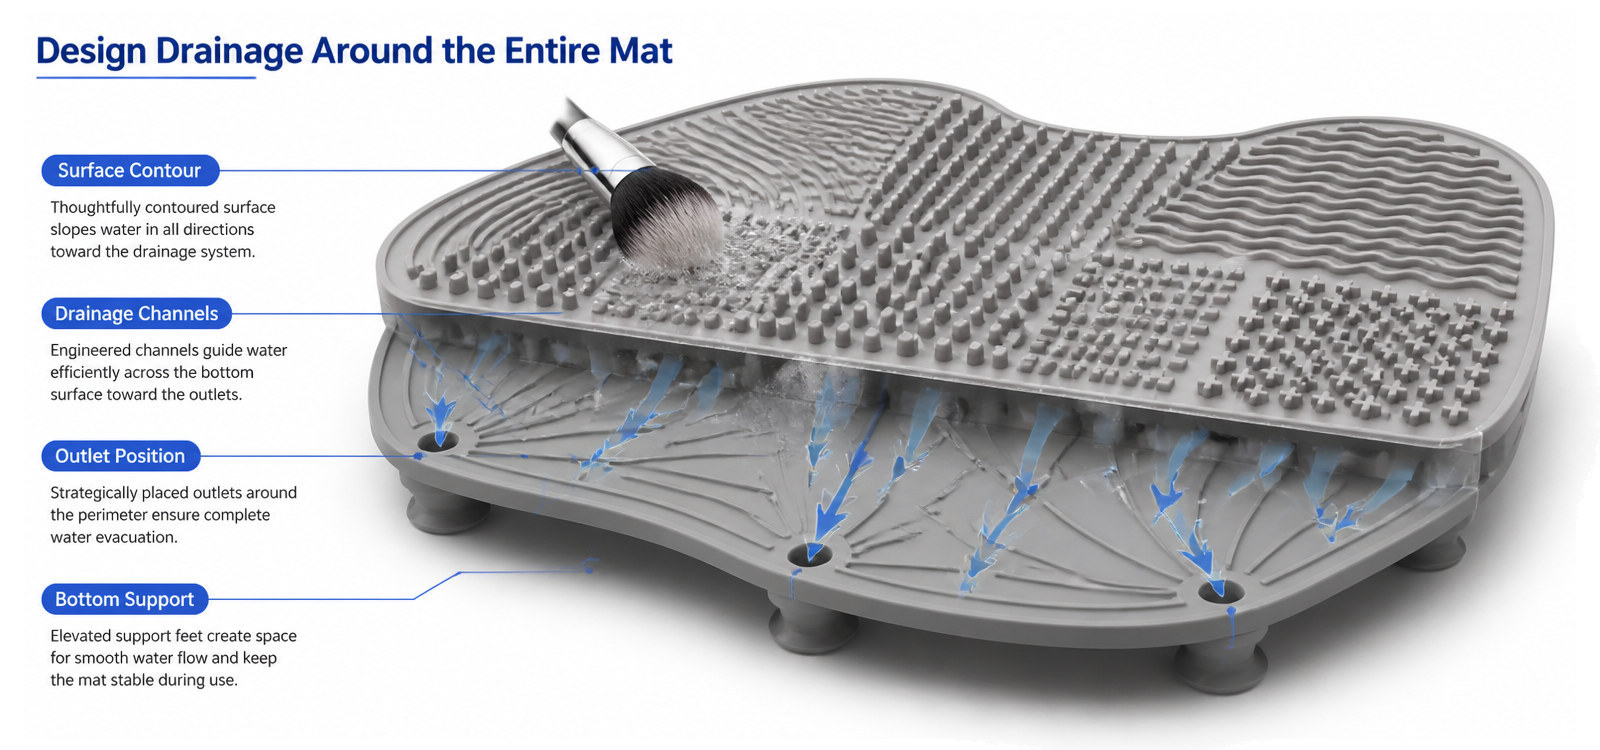
The bottom of the mat is the drainage system. Contour, channel, outlet and support have to agree, or water collects in the one spot nobody designed.
Common Drainage Design Mistakes to Avoid
- placing holes by visual symmetry instead of by water path;
- adding holes when the real problem is a high spot in the middle of the mat;
- putting holes above the collection point, so water has to travel uphill to reach them;
- making openings small enough to clog with cleanser residue;
- ignoring how the cleaning texture redirects water before it reaches the outlet;
- testing drainage only with the mat held in the hand instead of in its working position.
Most of these mistakes share one cause: the design was reviewed as a picture rather than as a surface that water moves across.
How to Verify Drainage Performance Before Mass Production
A drainage test does not need a laboratory. It needs a prototype in the right orientation and a measured amount of water.
- Place the sample in its intended working position on a flat, level surface.
- Pour a fixed volume of water onto the cleaning zone, from a fixed height, at a steady rate.
- Watch where the water stops moving, and mark those areas on the sample with a marker.
- Check whether residue, such as a diluted cleanser, passes through the openings or collects around them.
- Flex the mat at the openings and inspect for whitening, stretching, or a tear starting at the edge.
- Repeat the cycle several times and confirm the mat returns to its shape.
Record what happens rather than whether it passed. "Water remained in the two rear corners for over a minute" is a finding a toolmaker can act on. "Drainage is acceptable" is not.
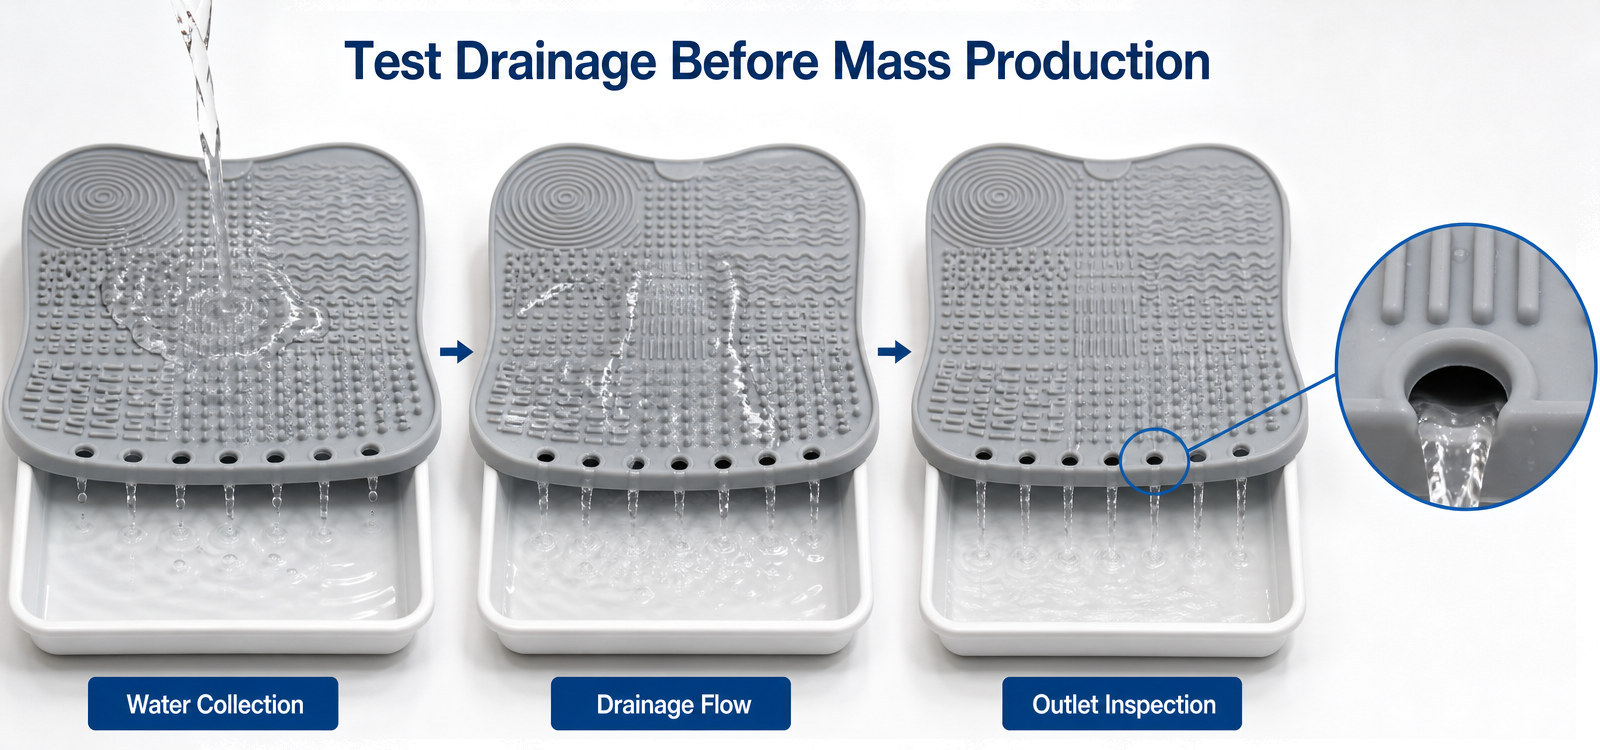
A drainage test with the mat in its working position. What matters is where water stops moving, not whether any water left the mat.
If a mat is also used with soap or oil-based cleansers, the interaction between the residue and the silicone surface is worth checking as well. Silicone's resistance to swelling in contact with liquids is commonly evaluated with immersion methods such as ASTM D471, which measures changes in mass, volume, and hardness after exposure. Those measurements matter here because a material that changes slightly in service changes the fit of the openings too.
Custom Silicone Makeup Brush Cleaning Mats for OEM and Private Label Brands
The drainage layout, texture layout, mat thickness, color, and branding are all decided at the design stage, and they interact. A brand that wants a deeper texture usually needs a thicker mat to keep the openings strong. A brand that wants a lighter mat usually needs to reduce texture density or accept slower drainage. Confirming those priorities before tooling is cheaper than discovering them during sampling.
FromRubber produces custom silicone brush cleaning mats and other molded parts for beauty brands and OEM buyers, including holders and organizers. Tooling development is supported by 10 CNC machines in-house, and production runs on 40 compression molding machines. If you have a reference product or a drawing, send it through the FromRubber inquiry form or message WhatsApp and WeChat at +86 18676210913, and we will review the drainage layout against the intended use before quoting.
Frequently asked questions
How many drainage holes does a silicone brush cleaning mat need?
There is no fixed number. What matters is whether the surface directs water to the outlets and whether the material between openings is strong enough. A mat with fewer, better-placed holes can drain faster than one with many holes in a flat field.
Should the drainage holes be on the edge or in the middle?
Usually along the perimeter or in a channel between cleaning zones, because that keeps the cleaning surface continuous. Middle openings are justified when the mat's lowest point is in the middle, which depends on the bottom contour.
Why does water still sit on the mat after washing?
Most often because the surface has a high spot or a texture dam that prevents water from reaching an outlet. The second most common cause is an opening too small to pass the remaining film quickly.
Can drainage be improved without changing the mold?
Sometimes, by changing the texture layout or adding a slight slope in a secondary operation, but any change to the openings or the bottom contour requires mold work. It is worth checking the prototype in its real orientation before deciding.
Does a thicker mat drain better?
A thicker mat allows larger or more closely spaced openings without losing strength, so it can drain better. Thickness alone does not create a flow path, however; the contour still has to lead water to the outlets.
Sources and further reading
- ISO 3302-1:2014, Rubber, Tolerances for products, Part 1: Dimensional tolerances. ISO 3302-1 standard page (https://www.iso.org/standard/62492.html)
- ASTM D471-16a(2021), Standard Test Method for Rubber Property, Effect of Liquids. ASTM D471 standard page (https://store.astm.org/d0471-16ar21.html)
- FromRubber technical notes: deep grooves versus fine textures in silicone mats, sponge case ventilation and storage design.